Aug 30, 2023

Windows Terminal : Always Run as Administrator

How to Enable Windows Terminal to always "Run as Administrator" option.

1) Open --> Windows Terminal

2) Goto --> Settings

3) Under "Profile" section, select which profile you want to enable, in this case select --> Command Prompt

4) On the right-pane, scroll down and search for --> Run this profile as Administrator = On


!!! HAPPY COMPUTING !!!

Aug 28, 2023

Disassembly : HP Z800 Workstation

Recently I have bought a "Refurbished" HP Z800 Workstation from an online platform. The purpose of the purchase was to setup my first ever "Home Lab" server, this server will host a few services that I have in mind such as:

  • JellyFin
  • RustDesk
  • WebDAV
  • Windows Server
  • Ubuntu Server
The server also serve as platform for me to perform all sorts of testing including new version release, new open source projects and many others. But as a start, I will sharing an overview of the system that I've bought and how to dismantle it for general servicing.

The system that I've bought comes with the following specifications:

  • Dual processor of Intel Xeon X5660 2.80Ghz, 6-Cores, 12-Threads, 12MB Cache (LGA 1366).
  • 48GB DDR3 1333Mhz ECC Registered DIMM (6 x 8GB), 12 DIMM slots [Kingston KTH-PL313/8G] with NUMA Technology.
  • Intel 5520 Chipset.
  • Intel Matrix 6-ports SATA-3 RAID Controller.
  • LSI 1068E 8-ports SAS/SATA-3 RAID Controller.
  • HP SAS Back Panel Connector Kit.
  • nVidia Quadro FX-1800 768MB GDDR3, 30-bit, CUDA, 2 x DisplayPort, 1 x DVI port PCIe.
  • Intel WG82574L Gigabit Ethernet.
  • Broadcom 5764 LOM Gigabit Ethernet.
  • Realtek HD ALC262 Audio.
  • LSI 1394 OHCI Firewire.
  • 850watts 85% (Bronze) Power Supply Unit.
  • 4 Internal 3.5" HDD drive bays.
  • 3 External 5.25" ODD/HDD drive bays.
  • 3 Internal USB 2.0 Headers.
  • Rear I/O :
    • 1 x IEEE-1394a
    • 6 x USB 2.0
    • 1 x Serial (RS232)
    • 1 x PS/2 Keyboard
    • 1 x PS/2 Mouse
    • 2 x RJ45 Gigabit LAN
    • 1 x Audio In
    • 1 x Audio Out
    • 1 x Microphone In
  • Front I/O :
    • 3 x USB 2.0
    • 1 x Headset Out
    • 1 x Microphone In
    • 1 x IEEE-1394a
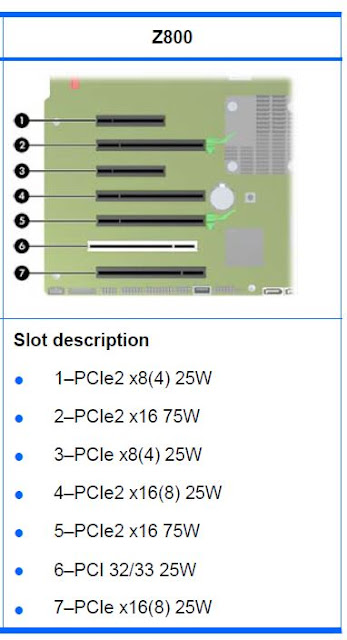
  • PCI Express Connectors :
    • 2 x PCIe Gen2 x16 slots 75W [Slot #2, #5].
    • 2 x PCIe Gen2 x16 (8) slots 25W [Slot #4, #7].
    • 2 x PCIe Gen2 x8 (4) slots 25W [Slot #1, #3].
    • 1 x PCI 32b, 33Mhz slot 25W [Slot #6].


Something to note that as this system is refurbished, there are some disadvantages :

  • Warranty already expired.
  • Tons of dust in the system.
  • Tons of scratches on both side of the panels.
  • Tons of small chips and dents.
  • Missing 2 Internal drive bay caddies.
  • Missing left-side feet trim.
  • Missing 1 rear slot cover.
  • Faulty DVDRW drive.

Under such "used" conditions, the system still able to POST and the seller also installed Windows 10 in a Kingston A400 240GB SSD (included as FREE) and I don't intend to use it. So far there are no issues with hardware side, only the appearance of the system is bad.

In order to clean this system properly, I have to dismantle almost everything and below are a video guide on how to dismantle it for cleaning purposes :


!!! HAPPY COMPUTING !!!

Aug 25, 2023

CloneZilla : Backup & Restore Computer (Disk-To-Image)

 CloneZilla : Backup & Restore Computer (Disk-To-Image).

This round we will focus on How-To Backup and Restore Computer using "Disk-To-Image" method in CloneZilla.


(A) STEPS 1 OF 4.
  1. Ensure the Source (Reference) Computer is in working condition, OS with up-to-date patches, installed Applications and Drivers etc.
  2. It is also recommended to perform a "Disk Cleanup" and "Defragmentation" before performing any backup.
  3. Firstly, is to Shutdown the computer and boot-up with CloneZilla bootable CD or External USB HDD.
  4. Select --> CloneZilla live (VGA 800x600)         {recommended}
  5. Select --> Preferred Language
  6. Select --> Keyboard type.
  7. Select --> Start CloneZilla
  8. Select --> device-image
  9. Select --> local_dev
  10. Press --> [ENTER]
  11. Plugin the External USB HDD and wait for 5 seconds.
  12. Then press --> [CTRL + C]
  13. Select --> the External USB HDD drive.
  14. Select --> Skip checking/repairing the file system before mounting
  15. Select --> the Main/Primary folder (if any) or just tab to "Done"
  16. Select --> Expert mode.
  17. Select --> savedisk option.
  18. When prompted, key-in the preferred Image File Name (eg. PC1_[Date])
  19. If there are multiple HDD in the Source Computer, ensure the correct HDD drive is selected.
  20. Select --> Priority:partclone option.
  21. Leave the extra parameters as default.
  22. Select the appropriate compression method or select --> -z1p Use parallel gzip compression, for multicore/CPU.         {aka normal compression}
  23. Leave the image splitting as default, which is "0"         {zero}
  24. Select --> Skip checking/repairing source file system.
  25. Select --> Yes, check the saved image.
  26. Select --> Not to encrypt the image.
  27. Select --> poweroff/Shutdown option.
  28. When prompted, type "Y" and press [ENTER].
  29. Wait until the backup process completed.
  30. Once completed the computer will auto-shutdown itself.

(B) STEPS 2 OF 4.
  1. Verify the backup image file.
  2. The image files should have the corresponding source hard drive's size.

(C) STEPS 3 OF 4.
  1. Boot-up the Target (Destination) Computer with CloneZilla.
  2. Ensure the Target's HDD is blank or data inside is no longer needed.
  3. Follow the above steps until you see "restoredisk" option, select --> restoredisk option to continue.
  4. Select --> the correct image file (if you have more than 1 image).
  5. Select --> Target HDD (if you have more than 1 HDD).
  6. Leave the extra parameters as default.
  7. Select --> Use the partition table from the image.
  8. Select --> No, skip checking the image before restoring.
  9. Select --> poweroff/Shutdown option.
  10. When prompted, type "Y" and press [ENTER].
  11. When prompted for confirmation, type "Y" and press [ENTER].
  12. You will be prompted again for confirmation, type "Y" and press [ENTER].
  13. Wait until the restore process completed and the computer will auto-shutdown itself.

(D) STEPS 4 OF 4.
  1. When everything is completed, you can now boot-up the Target computer to check everything such as installed applications, drivers, data etc.


!!! HAPPY COMPUTING !!!

Aug 11, 2023

Windows 10 : Delete Recovery Partition

Windows 10 "Recovery" partition is a special partition on system hard drive and is used to restore the system to factory settings in the event of system issues. To protect the recovery partition from being changed or deleted, the recovery partition usually doesn't have any drive letter assigned and other features or options are not available in Disk Management.

This "Recovery" partition can be deleted and it will not impact your existing Windows 10 OS. Though it can be deleted but to delete it, you must follow this steps.


NOTE : IT IS RECOMMENDED NOT TO DELETE THIS PARTITION ! DOING SO, YOU WILL NOT HAVE ANY LAST RESORTS IN THE EVENT OF OS ISSUES.


1. Run --> CMD (run as admin)

2. Type --> diskpart

3. Type --> list disk

4. Type --> select disk [number]
     (usually primary disk number is 0)

5. Type --> list partition

6. Type --> select partition [number]
     (in this case my, based on my drive's partition layout, the number is 4)

7. Type --> delete partition override

8. Type --> exit

9. Now, open "Disk Management" and you will notice that now there is a "Unallocated" space available in the drive.

10. Next step is to extend your [C:] drive by right-click --> Extend volume.

11. Ensure the full size is selected and click --> Next

12. Verify the new configuration and click --> Finish

Now you will have a larger capacity of the [C:] drive partition.


!!! HAPPY COMPUTING !!!
Aug 4, 2023

How To Identify Fake Kingston USB Drive

Recently I have bought a brand new Kingston USB drive from an Online Store. The purpose of this new drive was to make it as a bootable USB drive for Ventoy and hence the large capacity of 128GB.

It was a bargain at first...

After several FAILED attempts in making the drive to be bootable, I got curious and starting checking for the genuine of the product.

Here is my findings :-

1. The Packaging was not Kingston's standard packaging but does resembles the original packaging.

(Original Front Packaging)


(FAKE Front Packaging)


(Original Back Packaging)


(FAKE Back Packaging)


2. The original Kingston USB drive have "Laser" engraving on the USB key.


                          (FAKE USB Drive)                                                 (Original USB Drive)


3. Using a third party utility to check the USB drive's VID and PID information reveals more details. The utility was called "CheckUDisk V5.4", you may google this utility and download it, no installation required.


4. Upon having the details, now you can cross-check it on this website (https://the-sz.com/products/usbid/index.php), this website contains many USB manufacturer information and their respective model.


(FAKE VID and PID, returns something else instead of Kingston)


(Original VID and PID, returns the correct Kingston's information)


Conclusions, always buy from reputable seller or Manufacturer's Official Website. This will ensure you get the original product and works as intended.


!!! HAPPY COMPUTING !!!