Nov 16, 2016

Windows 10 - Anniversary ISO Download

Now I think all of you are aware that Microsoft have released an update called "Anniversary Update" to the public. To me... well its just another service pack release.

I wanted to point out that the stable release version is 1511, the "Anniversary" version is 1607, you can check your current system version & build by going to --> START --> Settings --> System --> About.


Now there are several methods available to download this update :-
  1. Download via Windows Updates.
  2. Download via Windows Updates Assistant.
  3. Download the ISO file directly.
We are not going to discuss method #1, which is relatively simple & straightforward. Instead we will be focussing more on method #2 and method #3.


Method #2.

This method is relatively also simple and doesn't poses much challenges. But the only drawbacks is that it will required a stable internet connection and it works on a single machine.

1. Just browse to this website Download Upgrade Assistant and click on the "Get the Anniversary Update now" button (as shown below).


This will download the update assistant into your computer, the filename is "Windows10Upgrade28084.exe" and its only 6MB in file size.

2. After download completed you will need to run utility, the utility will automatically detects your current operating system version and build and will auto-select the latest version & build to download. Just follow the on-screen instructions.

3. This utility will only detect & recommend the latest version & build and then proceeds to download the updates from Microsoft server and finally automatically install it for you. You may need to restart your computer 1-2 times for the updates to complete installing.

Note : the advantage of this method is simple for user but only works for a single machine and required a stable internet connection.


Method #3.

This method is to download the ISO file directly and later perform mass deployment to multiple machines and doesn't required an internet connections. Very suitable for enterprises with more than 10 machines & above.

1. To download the ISO, browse to this link Download ISO here.

2. Now at the "Select Edition" section (as shown below), you will need to select the desire edition you need and then click the "Confirm" button.


Note that there is 3 versions available for download :-
  1. Windows 10.
  2. Windows 10 N.
  3. Windows 10 Single Language.
If you resides outside of Europe, you can download the "Windows 10" file.
If you resides in Europe, you can download the "Windows 10 N" file.
If you are using other languages such as Japanese, Chinese version then download the "Windows 10 Single Language" file.

I am not going to explain the difference of these versions, you will need to google up yourself. As I'm a resident in Malaysia thus my standard version will just be "Windows 10" file.

3. Next you need to select your preferred language, well "English International" will just works fine for me. Then click on the "Confirm" button to continue.


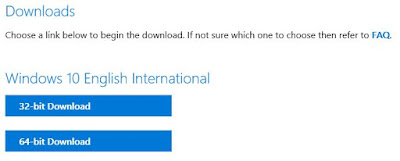
4. Next you will need to select your architecture (as shown below), either "32-bit Download" or "64-bit Download" version. Just click on the corresponding button and the download will start.


5. The ISO file size is approximately 3.94GB and depending on your internet speed, the download may varies. Once the download completed, you can use any of your preferred tools to burn the image into a DVD disc or you can even copied to an USB flash drive.

I hope you guys enjoy Windows 10 as much as I did and just for your information, you guys did know that Microsoft is going to end the support for Windows 7 right ?

So its time to upgrade to Windows 10.

!!! HAPPY UPGRADING !!!

Nov 7, 2016

Windows 7 - Unable to detect USB drives

Recently a colleague requesting my assistance on why the USB flash drives are not detected in the newer notebook model (eg. HP ProBook 640 G2).

It seems that the UEFI/BIOS are able to detect the USB flash drive & recognized it correctly... it was able to boot (it was configure to boot earlier into Windows 7) but unable to be detected during the installation wizard and not showing in "diskpart" utility.

Showing up in the "diskpart" utility is the first steps of the configuration they need to perform in order to continue to other steps. And they are in dire needs to have this solve the soonest... I think customer is squeezing their neck.... hehehe.... ;p

After some research & studies, I'm suspecting the USB3.0 drivers was the culprits behind the problems as Windows 7 are not bundled with USB3.0 drivers thus causing such problems. In order for the boot-up process to load the USB3.0 drivers and subsequently during the installations wizards to load the same drivers, I must first modify the "boot.wim" & "install.wim" files respectively.

Luckily, I found an utility to help me with it and thus minimizing my time spend for the solution. It's called "DISM GUI" from CodePlex. This utility is a GUI version for "dism" CLI. Much more easier to work with & easy to understand.

Now let's start the fun :-

1. First you will need a working bootable "Windows 7" USB flash drive (I am not going to write another How-To for this, there is already tons of guides on the internet).

2. Create a temporary working folder (eg. D:\WIM).

3. Create two (2) sub-folders inside D:\WIM, first folder is D:\WIM\USB3 and the second folder is D:\WIM\Mount.

4. Now in your bootable USB flash drive (assuming [G:\] is your USB flash drive), browse to G:\Sources folder and copy both boot.wim & install.wim files to the temporary working folder which is D:\WIM.

(Note : This may take a while, so be patience)

5. Once completed, you will need to download the "DISM GUI" utility from CodePlex, you may find the download link here (https://dismgui.codeplex.com/).

6. Next you also need to download the USB3.0 drivers from your manufacturer (recommended) or you can also use a generic drivers from Intel (only for Intel's chip). The download link is here (https://downloadcenter.intel.com/download/25476/Windows-7-USB-3-0-Creator-Utility)

(Note : For the sake of easy download, I have packaged all the required downloads here)

(Note : It is always recommended to download the correct USB3.0 drivers from your manufacturer if its not Intel chip).

7. After you have download the Intel drivers, extract the files and copy only the USB_Drivers\x86 &  USB_Drivers\x64 folders to D:\WIM\USB3\ location as shown below.


8. Now run the "DISM GUI" utility "as Administrator", a new windows is open as shown below.


9. At the "Mount Control" tab, click on "Choose WIM" button then browse & select "D:\WIM\boot.wim" file as shown below.


10. Next click "Choose Folder" button and select the mount point to "D:\WIM\Mount" folder. And then click "Mount WIM" button, this may take a while.


11. Once mounted, browse to "Driver Management" tab, then click "Choose Driver Folder" and select "D:\WIM\USB3" folder only. Ensure that both "Force Unsigned" and "Recurse" option is selected, next click "Add Drivers" button to continue, please wait for it to complete.


12. Go back to "Mount Control" tab, click on the "Dismount WIM" button, when prompted to commit changes, just click "Yes" button and wait for it to complete.


13. Now exit the "DISM GUI" utility.

14. Now copy the newly created "D:\WIM\boot.wim" file back to your USB flash drive and replacing the original file (G:\Sources\*.*).

15. Now repeat the same steps from #8 onwards for "D:\WIM\install.wim" file but this time you need to ensure that the correct "Index" is selected.

If you are not sure, click "Display WIM Info" button to show the correct index. This is steps is critical should the ISO image you used to create the bootable flash drives contains other editions of Windows 7 (such as Home, Professional, Enterprise, Ultimate).

Thus selecting the correct "Index" also ensure you are selecting the correct edition to load the USB3.0 drivers into it.


16. You will need to repeat this steps for each edition you want it to have the USB3.0 drivers. Else you just need to only perform this once for the edition of your choice.

17. Once you have commit the changes & unmounts, copy the "D:\WIM\install.wim" file back to your USB flash drive and replacing the original file "G:\Sources\*.*" and once completed you may eject the USB flash drive.

18. At the new computer (laptop in my case), you need to ensure the UEFI/BIOS is configured to be able to boot from USB flash drive. Once booted up via the USB flash drive, you should now be able to use "diskpart" utility and able to detect the USB flash drive itself correctly.

19. Below is the picture taken before the modification, you can see clearly that the USB flash drive is not detected in "diskpart" utility.


20. Below picture taken is after the modification, where I have added the USB3.0 drivers to both "boot.wim" and "install.wim" files. Here "diskpart" utility detected the USB flash drive correctly and indicated by the assigned [G:\] drive letter.


I hope this will help others as well and thanks for reading.

!!! HAPPY COMPUTING !!!