It seems that the UEFI/BIOS are able to detect the USB flash drive & recognized it correctly... it was able to boot (it was configure to boot earlier into Windows 7) but unable to be detected during the installation wizard and not showing in "diskpart" utility.
Showing up in the "diskpart" utility is the first steps of the configuration they need to perform in order to continue to other steps. And they are in dire needs to have this solve the soonest... I think customer is squeezing their neck.... hehehe.... ;p
After some research & studies, I'm suspecting the USB3.0 drivers was the culprits behind the problems as Windows 7 are not bundled with USB3.0 drivers thus causing such problems. In order for the boot-up process to load the USB3.0 drivers and subsequently during the installations wizards to load the same drivers, I must first modify the "boot.wim" & "install.wim" files respectively.
Luckily, I found an utility to help me with it and thus minimizing my time spend for the solution. It's called "DISM GUI" from CodePlex. This utility is a GUI version for "dism" CLI. Much more easier to work with & easy to understand.
Now let's start the fun :-
1. First you will need a working bootable "Windows 7" USB flash drive (I am not going to write another How-To for this, there is already tons of guides on the internet).
2. Create a temporary working folder (eg. D:\WIM).
3. Create two (2) sub-folders inside D:\WIM, first folder is D:\WIM\USB3 and the second folder is D:\WIM\Mount.
4. Now in your bootable USB flash drive (assuming [G:\] is your USB flash drive), browse to G:\Sources folder and copy both boot.wim & install.wim files to the temporary working folder which is D:\WIM.
(Note : This may take a while, so be patience)
5. Once completed, you will need to download the "DISM GUI" utility from CodePlex, you may find the download link here (https://dismgui.codeplex.com/).
6. Next you also need to download the USB3.0 drivers from your manufacturer (recommended) or you can also use a generic drivers from Intel (only for Intel's chip). The download link is here (https://downloadcenter.intel.com/download/25476/Windows-7-USB-3-0-Creator-Utility)
(Note : For the sake of easy download, I have packaged all the required downloads here)
(Note : It is always recommended to download the correct USB3.0 drivers from your manufacturer if its not Intel chip).
7. After you have download the Intel drivers, extract the files and copy only the USB_Drivers\x86 & USB_Drivers\x64 folders to D:\WIM\USB3\ location as shown below.

8. Now run the "DISM GUI" utility "as Administrator", a new windows is open as shown below.

9. At the "Mount Control" tab, click on "Choose WIM" button then browse & select "D:\WIM\boot.wim" file as shown below.

10. Next click "Choose Folder" button and select the mount point to "D:\WIM\Mount" folder. And then click "Mount WIM" button, this may take a while.

11. Once mounted, browse to "Driver Management" tab, then click "Choose Driver Folder" and select "D:\WIM\USB3" folder only. Ensure that both "Force Unsigned" and "Recurse" option is selected, next click "Add Drivers" button to continue, please wait for it to complete.

12. Go back to "Mount Control" tab, click on the "Dismount WIM" button, when prompted to commit changes, just click "Yes" button and wait for it to complete.

13. Now exit the "DISM GUI" utility.
14. Now copy the newly created "D:\WIM\boot.wim" file back to your USB flash drive and replacing the original file (G:\Sources\*.*).
15. Now repeat the same steps from #8 onwards for "D:\WIM\install.wim" file but this time you need to ensure that the correct "Index" is selected.
If you are not sure, click "Display WIM Info" button to show the correct index. This is steps is critical should the ISO image you used to create the bootable flash drives contains other editions of Windows 7 (such as Home, Professional, Enterprise, Ultimate).
Thus selecting the correct "Index" also ensure you are selecting the correct edition to load the USB3.0 drivers into it.

16. You will need to repeat this steps for each edition you want it to have the USB3.0 drivers. Else you just need to only perform this once for the edition of your choice.
17. Once you have commit the changes & unmounts, copy the "D:\WIM\install.wim" file back to your USB flash drive and replacing the original file "G:\Sources\*.*" and once completed you may eject the USB flash drive.
18. At the new computer (laptop in my case), you need to ensure the UEFI/BIOS is configured to be able to boot from USB flash drive. Once booted up via the USB flash drive, you should now be able to use "diskpart" utility and able to detect the USB flash drive itself correctly.
19. Below is the picture taken before the modification, you can see clearly that the USB flash drive is not detected in "diskpart" utility.

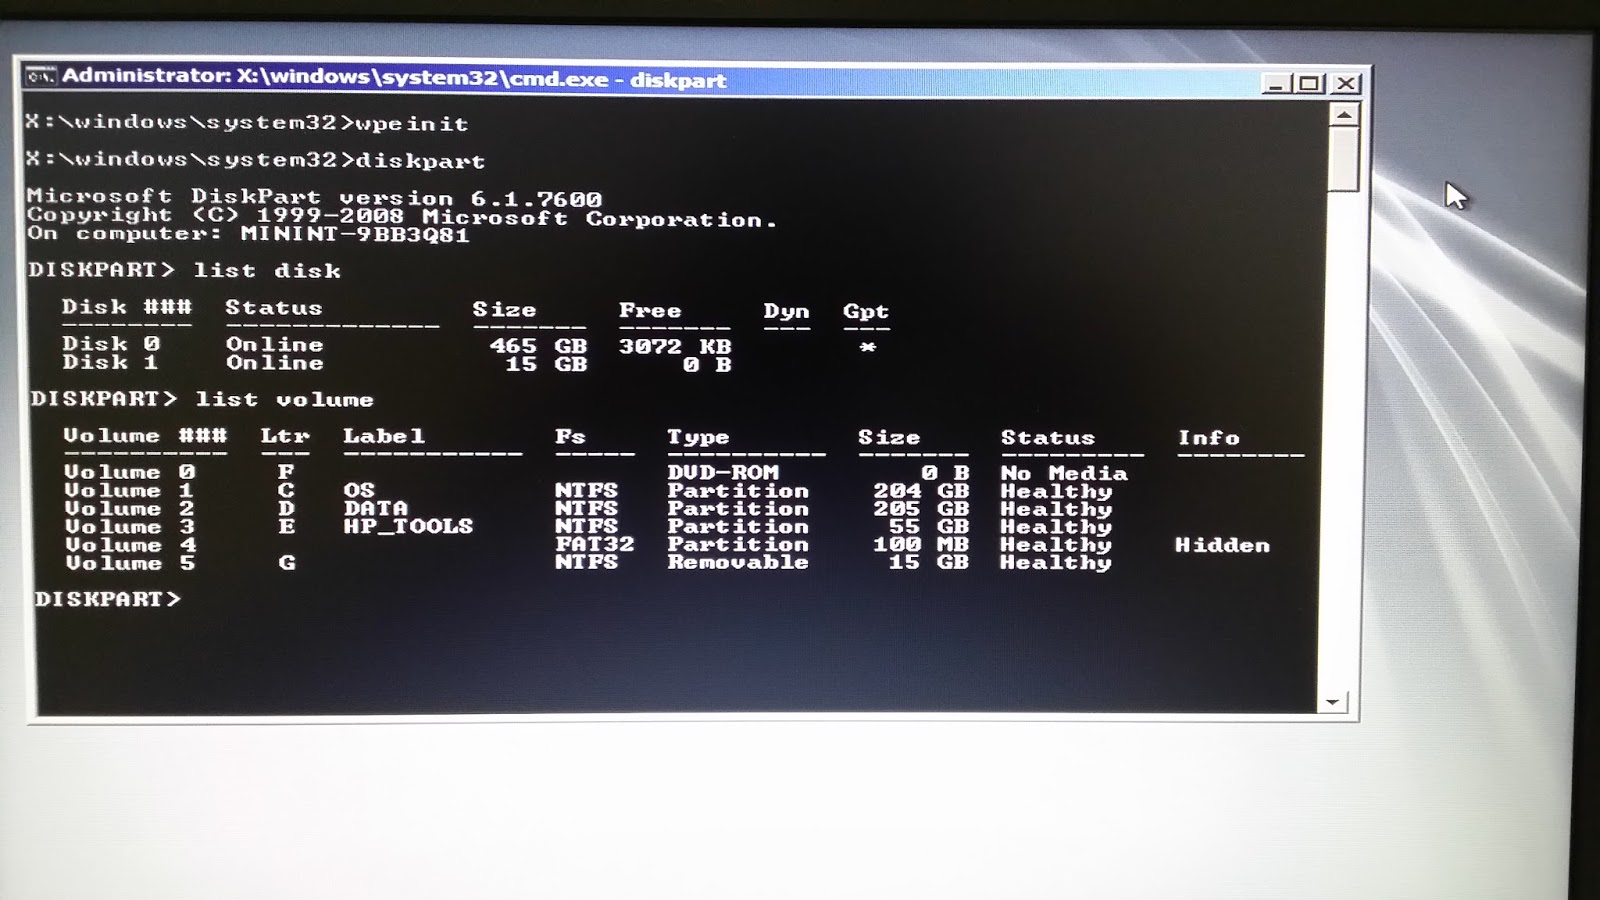
20. Below picture taken is after the modification, where I have added the USB3.0 drivers to both "boot.wim" and "install.wim" files. Here "diskpart" utility detected the USB flash drive correctly and indicated by the assigned [G:\] drive letter.
I hope this will help others as well and thanks for reading.
!!! HAPPY COMPUTING !!!
No comments:
Post a Comment