Showing posts with label Z800. Show all posts

Jul 28, 2024

HP Z800 Workstation : Update Firmware for LSI 1068E Controller

The LSI 1068E SAS/SATA RAID Controller is an embedded controller available in HP Z800 Workstation system. But the supported RAID level on this controller is RAID-0, RAID-1 and RAID-1E which is not suitable, due to the hardware designed you are not able to do RAID-5.

As such it makes sense to just update the firmware to IT Mode (Initiator-Target Mode) so that you can make use of ZFS that mostly found in TrueNAS, UnRaid, Proxmox VE etc.

The problems is that the LSI 1068E firmware are custom and specially made for HP Z series and there are no download available to change the controller to IT Mode. However someone on the Internet managed to find out that the 1068E chip is the same chip as 3081E (or compatible).


Pre-requisites :-
  1. A 4GB or larger USB Flash drive.
  2. LSI 3081E Firmware and MPT ROM files (https://www.broadcom.com/support/download-search?pg=Legacy+Products&pf=Legacy+Host+Bus+Adapters&pn=LSI+SAS+3081E-R&pa=Firmware&po=&dk=&pl=&l=false).
  3. Rufus Utility (https://rufus.ie/en/).

Steps-By-Steps :-

1. Prepare the USB Flash drive with Rufus, at the "Boot Selection" dropdown, select --> FreeDOS option.


2. Once completed, extract the downloaded firmware file into the USB flash drive, you might want to create a simple and short folder name for it (eg. SAS3918E).

You need to copy "sasflash.exe" from "SASflash_DOS_rel" folder and replace the existing file in the main folder. This is because the existing file in the main folder is for Windows use and not for DOS use, thus replacing the file is IMPORTANT.


3. Then plugin the USB flash drive to HP Z800 Workstation and boot the computer via the USB flash drive. You might need to press --> [F9] key to invoke the "Boot menu selection".


4. Once booted up, type the following command --> sasflash.exe -list

You should see the result something similar as below screenshot. Take note on the "Controller" where the "(B3)" is the type of the controller version. And also the "SAS Address" displayed, you might need this info at a later stage. Write it down or take a screenshot of the information.


5. Next is to run the batch file to update it, type --> hbaFlash.bat

The batch file will prompt you multiple questions, just follow the on-screen instructions. Below are just an example of my run :-


     Welcome to LSI Logic Integrated SAS Flash Utility
     This Utility will upgrade your LSI SAS HBA 


            !!!             WARNING              !!!
            !!! LSI strongly recommends you save !!!
            !!!  the existing firmware and BIOS  !!!
            !!!    currently installed on your   !!!
            !!!          SAS Controller          !!!


     Your existing firmware will be saved as Firmware.fw
     Your existing BIOS will be saved as     BIOS.rom
     in the current directory


     press y or n     (yes or no) ? Y

     Saving old firmware and BIOS

sasflash -ufirmware Firmware.fw
sasflash -ubios BIOS.rom


TO FLASH  3080     press  1
TO FLASH  3081     press  2
TO FLASH  3800     press  3
TO FLASH  3801     press  4
TO FLASH  3442     press  5
TO FLASH  3041     press  6
TO FLASH  3444     press  7
TO FLASH  31601    press  8

TO EXIT press 9

press 1 to 9 ? 2


The HBA is PCI-X or PCIe
For PCI-X press  X or x
For PCIe  press  E or e

To Exit press    Q or q

press X, E or Q ? E


IR or IT Firmware

For Integrated RAID (IR) press   R or r
For Initator-Target (IT) press   T or t

TO EXIT press   q

press R, T or q ? T


Which Chip Version?
For A3  press  1
For A4  press  2
For B0  press  3
For B1  press  4
For B2  press  5
For B3  press  6

To Exit press  7

press 1 to 6 (or 7 to quit) ? 6


You have selected 3081PCI-e T firmware with chip B3

sasflash -f 3081ETB3.fw -b MPTSAS.ROM

OK to Flash  press  F or f

TO EXIT press       q

TO EXIT press       q ? F

sasflash -o -f 3081ETB3.fw -b MPTSAS.ROM


6. Once the Flash have completed, type --> sasflash.exe -list 
to confirm the results of the flash, it should have the results as per screenshot below.


7. If for some reasons, the "SAS Address" displaying an error or have a "xxxxxxx-x-xxxx-xxxx" as a results, then you will need to change the address manually.

Type --> sasflash.exe -o -sasadd [your SAS Address]

Example:
sasflash.exe -o -sasadd 5001458007d1e026


8. Type --> sasflash.exe -list to confirm the changes of the "SAS Address", if the results is the same as per mine then you are good to go.


9. Reboot the computer and unplug the USB flash drive. During the normal boot-up process, you should see the new firmware version, new BIOS version and the new Mode displayed during the initialization of the HDDs.


!!! HAPPY COMPUTING !!!

Jun 27, 2024

Proxmox : PCIe Passthrough

How to passthrough a PCIe or On-Board device/controller in Proxmox VE v.8.2.4.

At times you might want to passthrough certain devices or controller to a VM Guest for full access and control. This can be a GPU, RAID Controller, NIC etc. This is very useful in scenario such as testing a NAS (TrueNAS).

Pre-requisites :-

1. System CPU must support IOMMU (I/O Memory Management Unit) interrupt remapping. Usually this is called Intel VT-d or AMD-Vi or similar names. Most newer Mainboard and CPU already have such features.

2. This passthrough methods means the entire device or controller is no longer in use by Proxmox VE itself and only manage by the VM Guest. This means you cannot passthrough a controller where the "Boot-Pool" is connected. It must be a separate controller or device.


Scenario :-

My test system or home lab system is a HP Z800 WorkStation series with the following hardware configurations, if your system is newer than mine then most probably it will works too :-

  • Dual Intel Xeon X5660 2.80Ghz, 6-Cores, 12-Threads, 12MB-Cache.
  • 96GB DDR3 1333Mhz ECC RAM.
  • Intel 5520 Chipset.
  • On-board Intel Matrix 6-ports SATA/RAID Controller.
  • On-board LSI 1068E 8-ports SAS/SATA Controller.
  • LSI 9212-4i SAS/SATA 4-ports PCIe Controller.

The "LSI 9212-4i SAS/SATA 4-ports PCIe Controller" is where Proxmox VE is installed, thus I cannot passthrough this controller.


Let's Get Started :-

1. Login to the Proxmox VE's WebUI.


2. Select the Node, in this case I have only a single node.


3. Open --> Shell


4. Verify that your system have IOMMU enabled.

 dmesg | grep -e DMAR -e IOMMU -e AMD-Vi

The results should shows "DMAR: IOMMU enabled" OR "DMAR: Intel(R) Virtualization Technology for Directed I/O". If either of these is missing then you need to check your BIOS/UEFI whether those virtualization technology are enabled.


5. Edit the "Kernel" file.

nano /etc/kernel/cmdline

Add the following line to the file.

root=ZFS=rpool/ROOT/pve-1 boot=zfs intel_iommu=on

If your CPU is and AMD type, then add "amd_iommu=on" to it.


6. Next is to edit the "Modules" file.

nano /etc/modules

Add the following into the file.

vfio
vfio_iommu_type1
vfio_pci
vfio_virqfd


7. Now we also need to edit the "GRUB" file.

nano /etc/default/grub

Look for the following line and append the line as shown.

GRUB_CMDLINE_LINUX_DEFAULT="quiet intel_iommu=on"

If your CPU is and AMD type, then add "amd_iommu=on" to it.


8. Once all done, we need to refresh the "Proxmox" boot.

proxmox-boot-tool refresh


9. Update the "initfamfs" also.

update-initramfs -u -k all


10. Next is to update "GRUB" also.

update-grub


11. Finally, we need to REBOOT the Proxmox VE host server.


12. After reboot, verify the "IOMMU" configuration.

dmesg | grep -e DMAR -e IOMMU -e AMD-Vi

Results :-
DMAR: IOMMU enabled OR DMAR: Intel(R) Virtualization Technology for Directed I/O


13. Verify "vfio" configuration.

lsmod | grep vfio

Results :-
vfio_pci          49152    0
vfio_virqfd          16384    1 vfio_pci
irqbypass                  16384    2 vfio_pci,kvm
vfio_iommu_type1   32768    0
vfio                           32768    2 vfio_iommu_type1,vfio_pci


14. Verify "Interrupt Remapping" configuration.

dmesg | grep 'remapping'

Results :-
AMD-Vi: Interrupt remapping enabled OR DMAR-IR: Enabled IRQ remapping in 2xapic mode (only for older CPU model)

If you encounter an error message on the remapping interrupts, type the following command and reboot the Proxmox server again.

echo "options vfio_iommu_type1 allow_unsafe_interrupts=1" > /etc/modprobe.d/iommu_unsafe_interrupts.conf


15. Now you can create a VM and passthrough a PCIe device to that VM. Take note you need to ensure the "Machine = q35" else it will not work.

Also note that the device must not be in the same IOMMU Group, if the device is in the same group of another device then high chances it will not work or the entire group will also be passthrough to the VM.


For more information :-
!!! HAPPY COMPUTING !!!


Jun 22, 2024

HP Z800 WorkStation : Disabled Option ROM Boot

This method is only required when you have added or upgraded with a SAS/SATA Controller (eg. LSI 9212-4i PCIe).

If this option is not disabled, you will get the following error :-

 110-Out of memory space for option ROMs

This is because the BIOS was not able to decide which Boot Controller it should use thus causing system conflict during boot.

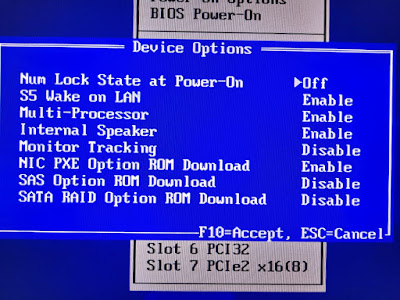
As recommended by HP, to solve this problems is to disable the option ROMs of the integrated Intel Matrix Storage Controller or the LSI 1068E SAS/SATA Controller.

1. During the System Boot, Press --> [F10] key to go into "Setup Mode".

2. Goto --> Advanced menu.

3. Select --> Device Options.


4. Look for either of these and "Disable" accordingly :-

    4.1 SAS Option ROM Download.
    4.2 SATA RAID Option ROM Download.


5. Next is to press --> [F10] key to accept the configuration changes.

6. Proceed to "Save & Exit" the BIOS and the system will reboot.

7. Upon reboot, the error will have been resolved and the newly added LSI 9212-4i PCIe Controller will now be detected along with its connected SSD/HDD.


!!! HAPPY COMPUTING !!!