A friend of mine asked me how to configure windows to automatically login each time the system boot up.
Well this very simple but be warned, the username and password is stored in ASCII mode (in other words, plain text !). If the computer doesn't have any security issues then please proceed, else you might want to consult your Administrator for this.
1. Run --> regedit.
2. Browse --> HKLM\Software\Microsoft\Windows NT\CurrentVersion\Winlogon.
3. Look for --> AutoAdminLogon --> Modify --> 1 --> OK.
* 1 = Enable, 2 = Disable
4. Next modify --> DefaultPassword --> [your password] --> OK.
* If not available, create a STRING VALUE.
5. Modify also --> DefaultUserName --> [your username] --> OK.
* If not available, create a STRING VALUE.
6. Restart the computer and it should auto-login by itself.
Please take note that the username and password must match the same you have created in the "Computer Configuration", otherwise it will not work.
Again, emphasizing that the username & password is stored in plain text, it will create another vulnerability access on the computer. Unless really necessary to do this, else stay away from doing this.
BE WARNED !!!
Sep 28, 2015
Windows 7 - Disabled UAC Warning in Registry
There might some times where you wanted to disabled the annoying UAC warning, its very simple relatively :-
1. Run --> regedit.
2. Browse --> HKLM\Software\Microsoft\Windows\CurrentVersion\Policies\System
3. Look for --> EnableLUA --> Right-click and select --> Modify option.
4. Change the value --> 0 {zero} --> Click --> OK.
5, Restart the computer.
That's simple right ? :)
1. Run --> regedit.
2. Browse --> HKLM\Software\Microsoft\Windows\CurrentVersion\Policies\System
3. Look for --> EnableLUA --> Right-click and select --> Modify option.
4. Change the value --> 0 {zero} --> Click --> OK.
5, Restart the computer.
That's simple right ? :)
Sep 27, 2015
Windows 7 - Disabled Windows 10 Upgrade Tray Notification
Yes, Windows 10 is now available for upgrade to those computer with eligible hardware and licenses, but what if I don't want to upgrade ?

Doesn't the annoying notification in the system tray bother you ? Well to me yes, I find it very distracting and after some search in Microsoft website, they have recommended to uninstall "Update for Microsoft Windows (KB3035583)".
Just follow the below steps :-
1. Press --> CTRL + ALT + DELETE.
2. This will open the "Task Manager" windows, now select GWX.exe and --> End Process.
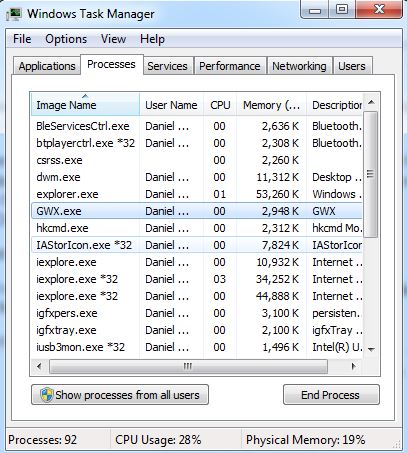
3. Now the "Windows 10 Upgrade Notification" icon is remove from the system tray, but this is not permanent yet, to make it permanent you must uninstall the update.
4. Goto --> Control Panel --> Programs and Features --> View installed updates --> Update for Microsoft Windows (KB3035583) --> Uninstall.

Alternative method to uninstall this update via the command line, run --> CMD (as Administrator) --> wusa /uninstall /KB:3035583 --> [ENTER].

5. After the uninstall process completed, just restart the computer. Now once restarted, browse to --> C:\Windows\System32\GWX folder.
If the folder exist, just delete the entire folder.

6. Now the notification will no longer shown in the system tray, but wait here's the catch to ensure that "Windows Update" do not update it again, you must "Hide" this update.
That's all now and Happy Computing ! :)
Sep 26, 2015
Windows 7 - Printer Port Redirection
Recently a friend of mine requested some help. He is facing some problems where the new computer he bought only have USB ports available but his existing printer is using LPT port.
In this the kind of scenario, commonly people will tends to get a USB-LPT converter available in any computer shop. And does him, which he went to Plaza Low Yat to buy that particular converter.
Now the connection problems is now solved, how about installing it ?
It just happens that the printer he wanted to use is Epson TM-U210, it's a dot matrix receipt printer type that are commonly used in P.O.S. (Point Of Sales System), so he did some downloads of the drivers in Epson's website and to his surprise Windows kept on displaying an error message stating
"There are no compatible drivers available or the path is incorrect......"
So this where I comes in, remoting to the said computer via TeamViewer (I was at work that time) and force the printer to be installed as "Generic/Text Only" printer. Tested the print test page and it works just fine, even printing from a notepad also works.
But here is another catch, the software or P.O.S. system his company is using only supports LPT1, Com1 type of connection (pretty old), so I've paused for a while trying to search my mind how to solve this problems and voila !
Follow the below steps :-
What it does is by telling Windows to accept all incoming connections for LPT1 port and redirect it to the network path with auto-reconnect enabled. In this case its a loop back network path (to itself).
Just a simple and brilliant workaround. :)
In this the kind of scenario, commonly people will tends to get a USB-LPT converter available in any computer shop. And does him, which he went to Plaza Low Yat to buy that particular converter.
Now the connection problems is now solved, how about installing it ?
It just happens that the printer he wanted to use is Epson TM-U210, it's a dot matrix receipt printer type that are commonly used in P.O.S. (Point Of Sales System), so he did some downloads of the drivers in Epson's website and to his surprise Windows kept on displaying an error message stating
"There are no compatible drivers available or the path is incorrect......"
So this where I comes in, remoting to the said computer via TeamViewer (I was at work that time) and force the printer to be installed as "Generic/Text Only" printer. Tested the print test page and it works just fine, even printing from a notepad also works.
But here is another catch, the software or P.O.S. system his company is using only supports LPT1, Com1 type of connection (pretty old), so I've paused for a while trying to search my mind how to solve this problems and voila !
Follow the below steps :-
- Ensure the printer's driver is installed, either use "Generic/Text Only" or use manufacturer's provided drivers.
- Share the printer, use a short common name (eg. "Receipt").
- Run --> Command Prompt with elevated privilege.
- Type --> NET USE LPT1 \\[PC Name]\[Printer's Share Name] /PERSISTENT:YES
- Now the printer should be printing like normal.
What it does is by telling Windows to accept all incoming connections for LPT1 port and redirect it to the network path with auto-reconnect enabled. In this case its a loop back network path (to itself).
Just a simple and brilliant workaround. :)
Sep 15, 2015
TeamViewer - Fix "Suspected Commercial Use"
In such case, sometimes you are a genuine home user just offering your assistance to your friends or family but TeamViewer's trial or "suspected commercial use" message is preventing you.
Please play fair, I've been using TeamViewer for my daily use and I've registered a full version as I find it very useful and convenient. Please do register.
Happy Remoting !
Please play fair, I've been using TeamViewer for my daily use and I've registered a full version as I find it very useful and convenient. Please do register.
- Close the running TeamViewer.
- Goto START --> RUN --> Type "%appdata%" --> Delete "TeamViewer" folders.
- Now goto START --> Type "regedit" --> Press [ENTER] key.
- Browse to --> HKCU\Software\TeamViewer --> Delete the entire registry entry.
- Browse to --> HKLM\Software\TeamViewer --> Delete the entire registry entry also.
- Now restart your computer and run TeamViewer again, it should have fixed the problems.
Happy Remoting !
Sep 7, 2015
VMWare - Moving/Copying VM(s) to another host server.
These few days I have received an order to upgrade an existing VM with higher memory capacity in order to cope with workload.
Sadly the host (eg. ESXi-1) which the VM is running on have used all the maximum available memory thus a new server must be acquired.
Now the problems arises where the client didn't have any vCenter server thus there's vMotion was not available for the task. After some studies in VMware's KB articles, there is a way to move a VM from 1 host to another host regardless of the hardware specifications.
But for me to play it at a safe side, I ensure the new server is installed with the same ESXi version and the VM must be shutdown for this process (yes, there is downtime on this).
So I get a temporary desktop (Windows 7) & install vSphere Client and an extra 1TB of HDD, what VMware recommended in their website is to use vSphere Client to perform the migration and the following steps was done by myself.
Now once the download complete, I perform the following :-
Once the upload is complete you need to "add into inventory" in order for the ESXi-2 server to recognised it as a VM.
Sadly the host (eg. ESXi-1) which the VM is running on have used all the maximum available memory thus a new server must be acquired.
Now the problems arises where the client didn't have any vCenter server thus there's vMotion was not available for the task. After some studies in VMware's KB articles, there is a way to move a VM from 1 host to another host regardless of the hardware specifications.
But for me to play it at a safe side, I ensure the new server is installed with the same ESXi version and the VM must be shutdown for this process (yes, there is downtime on this).
So I get a temporary desktop (Windows 7) & install vSphere Client and an extra 1TB of HDD, what VMware recommended in their website is to use vSphere Client to perform the migration and the following steps was done by myself.
- Run defragment on that VM.
- Ensure no one is using that VM anymore (a scheduled downtime required) & shutdown the VM.
- Browse to that particular "Datastore" where the VM is located and download the entire folder into the extra 1TB HDD with the same folder structure.
Now once the download complete, I perform the following :-
- Ensuring the VM is no longer power on automatically on ESXi-1 server & stays shutdown.
- Comparing the file sizes on ESXi-1 server & the downloaded copy.
- Now ensure the new server is ready (eg. ESXi-2) with sufficient storage space for the "Datastore".
- Start uploading the entire folder from the local copy to ESXi-2 datastore.
Once the upload is complete you need to "add into inventory" in order for the ESXi-2 server to recognised it as a VM.
- At ESXi-2 server, browse to the "Datastore" where the new VM has uploaded.
- Select the VM's folder and search for "xxx.vmx" file.
- Right-click the "xxx.vmx" file --> Select "Add to inventory" option and wait for it to complete.
- Open the VM Console and you will receive a prompt message, select --> "I move it" option.
- Once completed, you may now startup that VM.
Subscribe to:
Posts (Atom)