Recently I've encountered a very weird and odd problems when performing printer sharing in Windows 7/10.
The Windows 10 (aka PC-1) is connected with a new HP LaserJet Pro M402dn via a USB cable, the drivers installed without any problems and sharing was configured with correct credentials and permissions.
Now the problems occurs on a Windows 7 (aka PC-2) which need to use that new printer and since its networked the sharing should have no problems, but there's where I encountered the problems. It kept on prompting the same error message "A policy enabled on your computer that blocks Windows NT 4.0 kernel drivers...."
I was surprised on this error, as there's no policy configured for such blocking on both of the computers. Well, I will just go have a look in the local GPO and there's nothing configured on the kernel thingy.
Well, "Googling" was my next choice and found out that this was a common problems for Windows 7 which are not properly patched. Well doing a full patching will waste my time thus I go for more shorter time workaround which was a very simple steps :-
1. Open --> Services.
2. Browse for --> Print Spooler --> and Stop it.
3. Next, open Windows Explorer and browse to --> C:\Windows\System32\spool\drivers folder.
4. Inside the folder contains 2 folders called "W32x86" and "x64" folders, now you will need to rename both folders to another. I just add a ".old" to them, which end up to "W32x86.old" and "x64.old" folders name.
5. Now, go back to "Services" and START back the "Print Spooler" service.
6. Next is add the shared printer manually, by either creating a "Local Port" (eg. \\[Hostname]\[Printer 's Shared Name]) or by IP Address and manually point it to the correct drivers.
Simple as that and it only takes me 5 minutes.
HAPPY COMPUTING !!!
Dec 10, 2017

Jul 3, 2017
Windows 10 - Install .NET Framework 3.5 (Offline Method)
Windows 10 have been released for quite sometimes now, for those who involved in creating a master image (reference image for mass deployment) find it some features was not enabled by default and vice versa.
Sadly, some drivers or applications required the use of .NET Framework 3.5 (includes .NET 2.0 & 3.0) to works correctly.
Some applications may have bundled the offline installer together while others doesn't and I find troublesome to connect to internet to download the installer (which took me about 20 mins to complete & time wasting).
Actually the .NET Framework 3.5 was already inside the Windows 10 DVD but it was not installed by default. I find this to be odd as when you enabled the features via the "Programs and Features" menu, the wizard will still connects to the internet instead of searching for it in the DVD itself.
Follow these steps to install the .NET Framework 3.5 (includes .NET 2.0 & 3.0) from the DVD source :-
1. Ensure the Windows 10 DVD is inserted then run the "Command Prompt" as administrator.
2. Type in the following command --> dism /online /enable-feature /featurename:NetFX3 /All /Source:E:\sources\sxs /LimitAccess
Note : the [E:] drive corresponds to your DVD drive letter and may differ from your computer.

3. Please be patience and leave it to run until complete (as shown below).

4. After completion you can now check it via the "Programs and Features" menu, the ".NET Framework 3.5 (includes .NET 2.0 & 3.0)" features is now selected and enabled.
5. You might need to restart your computer before continue any drivers or applications installations.
!!! HAPPY COMPUTING !!!
Sadly, some drivers or applications required the use of .NET Framework 3.5 (includes .NET 2.0 & 3.0) to works correctly.
Some applications may have bundled the offline installer together while others doesn't and I find troublesome to connect to internet to download the installer (which took me about 20 mins to complete & time wasting).
Actually the .NET Framework 3.5 was already inside the Windows 10 DVD but it was not installed by default. I find this to be odd as when you enabled the features via the "Programs and Features" menu, the wizard will still connects to the internet instead of searching for it in the DVD itself.
Follow these steps to install the .NET Framework 3.5 (includes .NET 2.0 & 3.0) from the DVD source :-
1. Ensure the Windows 10 DVD is inserted then run the "Command Prompt" as administrator.
2. Type in the following command --> dism /online /enable-feature /featurename:NetFX3 /All /Source:E:\sources\sxs /LimitAccess
Note : the [E:] drive corresponds to your DVD drive letter and may differ from your computer.

3. Please be patience and leave it to run until complete (as shown below).

4. After completion you can now check it via the "Programs and Features" menu, the ".NET Framework 3.5 (includes .NET 2.0 & 3.0)" features is now selected and enabled.
5. You might need to restart your computer before continue any drivers or applications installations.
!!! HAPPY COMPUTING !!!
Feb 5, 2017
Windows 10 - Remove Provisioned Apps
This is my second post about Windows 10 built-in apps (Provisioned Apps), some of us just don't like the built-in apps... just like the ridiculous Xbox apps which I find it to be best at hogging system resources.
Now my last post was to remove those built-in apps, but later I found it was still in Windows 10 when another user logged-in. After much googling and studying MSDN and TechNet, I found a powershell script and I wrote some sample of my own.
First of all, you still need to run the previous powershell script to ensure that all users are not provisioned with the built-in apps, just in case I have re-posted those script here for your references.
Note : You can choose which apps you want to retain back.
After you have completed the above script, now you can run the 2nd script as below, also you can choose which apps you want to retain back.
After completion, you just need to restart the computer. Please be aware that if an apps was still provisioned to a user, you cannot remove that apps. As such it is important that you ensure no users is still requiring that apps before removing.
I find this to be useful especially when you want to create a consistent operating environment (COE) for a corporate/enterprise system.
!!! HAPPY SCRIPTING !!!
!!! HAPPY CHINESE NEW YEAR !!!
Now my last post was to remove those built-in apps, but later I found it was still in Windows 10 when another user logged-in. After much googling and studying MSDN and TechNet, I found a powershell script and I wrote some sample of my own.
First of all, you still need to run the previous powershell script to ensure that all users are not provisioned with the built-in apps, just in case I have re-posted those script here for your references.
|
Get-AppxPackage -allusers *3dbuilder* | Remove-AppxPackage
Get-AppxPackage -allusers *windowsalarms* | Remove-AppxPackage
Get-AppxPackage -allusers *zunevideo* | Remove-AppxPackage
Get-AppxPackage -allusers *officehub* | Remove-AppxPackage
Get-AppxPackage -allusers *skypeapp* | Remove-AppxPackage
Get-AppxPackage -allusers *getstarted* | Remove-AppxPackage
Get-AppxPackage -allusers *zunemusic* | Remove-AppxPackage
Get-AppxPackage -allusers *solitairecollection* | Remove-AppxPackage
Get-AppxPackage -allusers *bingfinance* | Remove-AppxPackage
Get-AppxPackage -allusers *bingnews* | Remove-AppxPackage
Get-AppxPackage -allusers *people* | Remove-AppxPackage
Get-AppxPackage -allusers *windowsphone* | Remove-AppxPackage
Get-AppxPackage -allusers *commsphone* | Remove-AppxPackage
Get-AppxPackage -allusers *bingsports* | Remove-AppxPackage
Get-AppxPackage -allusers *windowsstore* | Remove-AppxPackage
Get-AppxPackage -allusers *bingweather* | Remove-AppxPackage
Get-AppxPackage -allusers *xboxapp* | Remove-AppxPackage
Get-AppxPackage -allusers *twitter* | Remove-AppxPackage
Get-AppxPackage -allusers *office.sway* | Remove-AppxPackage
Get-AppxPackage -allusers *xboxonesmartglass* | Remove-AppxPackage
Get-AppxPackage -allusers *messaging* | Remove-AppxPackage
|
After you have completed the above script, now you can run the 2nd script as below, also you can choose which apps you want to retain back.
|
Remove-AppxProvisionedPackage -online -packagename
Microsoft.3DBuilder_11.0.47.0_neutral_~_8wekyb3d8bbwe
Remove-AppxProvisionedPackage -online -packagename
Microsoft.BingWeather_4.9.51.0_neutral_~_8wekyb3d8bbwe
Remove-AppxProvisionedPackage -online -packagename
Microsoft.Getstarted_3.11.3.0_neutral_~_8wekyb3d8bbwe
Remove-AppxProvisionedPackage -online -packagename
Microsoft.Messaging_2.7.1001.0_neutral_~_8wekyb3d8bbwe
Remove-AppxProvisionedPackage -online -packagename
Microsoft.MicrosoftOfficeHub_2015.6801.23751.0_neutral_~_8wekyb3d8bbwe
Remove-AppxProvisionedPackage -online -packagename
Microsoft.MicrosoftSolitaireCollection_3.9.5100.0_neutral_~_8wekyb3d8bbwe
Remove-AppxProvisionedPackage -online -packagename Microsoft.Office.OneNote_2015.6868.57981.0_neutral_~_8wekyb3d8bbwe
Remove-AppxProvisionedPackage -online -packagename
Microsoft.OneConnect_1.1605.17.0_neutral_~_8wekyb3d8bbwe
Remove-AppxProvisionedPackage -online -packagename
Microsoft.People_2016.709.155.0_neutral_~_8wekyb3d8bbwe
Remove-AppxProvisionedPackage -online -packagename
Microsoft.People_2016.709.155.0_neutral_~_8wekyb3d8bbwe
Remove-AppxProvisionedPackage -online -packagename
Microsoft.SkypeApp_11.4.86.0_neutral_~_kzf8qxf38zg5c
Remove-AppxProvisionedPackage -online -packagename
Microsoft.StorePurchaseApp_1.0.454.0_neutral_~_8wekyb3d8bbwe
Remove-AppxProvisionedPackage -online -packagename
Microsoft.WindowsAlarms_2016.622.2118.0_neutral_~_8wekyb3d8bbwe
Remove-AppxProvisionedPackage -online -packagename microsoft.windowscommunicationsapps_2015.6868.41201.0_neutral_~_8wekyb3d8bbwe
Remove-AppxProvisionedPackage -online -packagename
Microsoft.WindowsFeedbackHub_1.3.1741.0_neutral_~_8wekyb3d8bbwe
Remove-AppxProvisionedPackage -online -packagename Microsoft.WindowsMaps_2016.701.2235.0_neutral_~_8wekyb3d8bbwe
Remove-AppxProvisionedPackage -online -packagename
Microsoft.WindowsStore_11606.1001.394.0_neutral_~_8wekyb3d8bbwe
Remove-AppxProvisionedPackage -online -packagename
Microsoft.XboxApp_2016.623.248.0_neutral_~_8wekyb3d8bbwe
Remove-AppxProvisionedPackage -online -packagename
Microsoft.XboxIdentityProvider_2016.616.818.0_neutral_~_8wekyb3d8bbwe
Remove-AppxProvisionedPackage -online -packagename
Microsoft.ZuneMusic_2019.6.19261.0_neutral_~_8wekyb3d8bbwe
Remove-AppxProvisionedPackage -online -packagename
Microsoft.ZuneVideo_2019.6.19281.0_neutral_~_8wekyb3d8bbwe
|
I find this to be useful especially when you want to create a consistent operating environment (COE) for a corporate/enterprise system.
!!! HAPPY SCRIPTING !!!
!!! HAPPY CHINESE NEW YEAR !!!
Dec 3, 2016
Office 2016 - Outlook AutoDiscover.xml
Recently one of my client have upgraded their Microsoft Office from 2013 to 2016 version and have encountered problems in creating an Outlook profile for their new employee(s).
What I have discovered is that Outlook 2016 no longer provide the "Outlook Anywhere" features whereby all Outlook accounts must be connected to Exchange server directly for .ost synchronization thus the feature is no longer available.
According to Microsoft the reason behind the changes is having .ost directly connected to Exchange server is for more stability & reliability... yeah rite. To me it seems more to forcing customers to upgrade their Exchange server for the new functions & features.
Anyway, luckily I am not the first one to encounter this problems any there are many solutions out there, but this is one particular solution that have worked for me.
And here are the steps :-
1. First you will need to create an "autodiscover.xml" file with the following contents. You can do this by using notepad.
Note : Change the [FQDN] to your domain name (eg. domain.com or domain.com.my)
2. Next is to modify the registry so that Outlook 2016 is aware of the "autodiscover,xml" file and its path.
3. Open --> regedit --> Browse to --> HKEY_CURRENT_USER\Software\Microsoft\Office\16.0\Outlook\AutoDiscover.
Note : Create "AutoDiscover" key if not available.
4. Create --> String Value = [FQDN].
Note : Change the [FQDN] to your domain name (eg. domain.com or domain.com.my)
5. Then modify the value of the "String Value" = [Path to "autodiscover.xml" file], for example (C:\AutoDiscover\autodiscover.xml)
6. Below is the example of the registry, you may use this to import the registry but remember to modify it accordingly before importing.
7. Now you can open Outlook 2016 and use its wizard to configure user's account accordingly, Outlook should be able to locate your Exchange server now and will prompt for username and password.
8. At certain times, Outlook will prompt for username & password twice or thrice or sometimes more (depends whether your Exchange's autodiscover is published correctly or not), and sometimes it may prompt for certificate installations.
9. This is normal as your Exchange is trying to authenticate you by using both MAPI & HTTPS protocol and certificate (if any). Thus the multiple prompts for username & password.
Some user(s) have claimed that this also works with Office 365 environment, but I have to test it out and unsure of the outcome. But for my customer's environment this just works perfectly.
!!! HAPPY COMPUTNG !!!
What I have discovered is that Outlook 2016 no longer provide the "Outlook Anywhere" features whereby all Outlook accounts must be connected to Exchange server directly for .ost synchronization thus the feature is no longer available.
According to Microsoft the reason behind the changes is having .ost directly connected to Exchange server is for more stability & reliability... yeah rite. To me it seems more to forcing customers to upgrade their Exchange server for the new functions & features.
Anyway, luckily I am not the first one to encounter this problems any there are many solutions out there, but this is one particular solution that have worked for me.
And here are the steps :-
1. First you will need to create an "autodiscover.xml" file with the following contents. You can do this by using notepad.
|
<?xml version="1.0" encoding="UTF-8"?>
-<Autodiscover
xmlns="http://schemas.microsoft.com/exchange/autodiscover/responseschema/2006">
-<Response
xmlns="http://schemas.microsoft.com/exchange/autodiscover/outlook/responseschema/2006a">
-<Account>
<AccountType>email</AccountType>
<Action>redirectUrl</Action>
<RedirectUrl>https://autodiscover.[FQDN]/autodiscover/autodiscover.xml</RedirectUrl>
</Account>
</Response>
</Autodiscover>
|
|
Windows Registry Editor Version 5.00
[HKEY_CURRENT_USER\SOFTWARE\Microsoft\Office\16.0\outlook\AutoDiscover]
"[FQDN]"="[Path]\\autodiscover.xml"
|
Nov 16, 2016
Windows 10 - Anniversary ISO Download
Now I think all of you are aware that Microsoft have released an update called "Anniversary Update" to the public. To me... well its just another service pack release.
I wanted to point out that the stable release version is 1511, the "Anniversary" version is 1607, you can check your current system version & build by going to --> START --> Settings --> System --> About.

Now there are several methods available to download this update :-
Method #2.
This method is relatively also simple and doesn't poses much challenges. But the only drawbacks is that it will required a stable internet connection and it works on a single machine.
1. Just browse to this website Download Upgrade Assistant and click on the "Get the Anniversary Update now" button (as shown below).

This will download the update assistant into your computer, the filename is "Windows10Upgrade28084.exe" and its only 6MB in file size.
2. After download completed you will need to run utility, the utility will automatically detects your current operating system version and build and will auto-select the latest version & build to download. Just follow the on-screen instructions.
3. This utility will only detect & recommend the latest version & build and then proceeds to download the updates from Microsoft server and finally automatically install it for you. You may need to restart your computer 1-2 times for the updates to complete installing.
Note : the advantage of this method is simple for user but only works for a single machine and required a stable internet connection.
Method #3.
This method is to download the ISO file directly and later perform mass deployment to multiple machines and doesn't required an internet connections. Very suitable for enterprises with more than 10 machines & above.
1. To download the ISO, browse to this link Download ISO here.
2. Now at the "Select Edition" section (as shown below), you will need to select the desire edition you need and then click the "Confirm" button.

Note that there is 3 versions available for download :-
If you resides in Europe, you can download the "Windows 10 N" file.
If you are using other languages such as Japanese, Chinese version then download the "Windows 10 Single Language" file.
I am not going to explain the difference of these versions, you will need to google up yourself. As I'm a resident in Malaysia thus my standard version will just be "Windows 10" file.
3. Next you need to select your preferred language, well "English International" will just works fine for me. Then click on the "Confirm" button to continue.

4. Next you will need to select your architecture (as shown below), either "32-bit Download" or "64-bit Download" version. Just click on the corresponding button and the download will start.
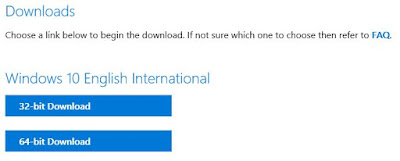
5. The ISO file size is approximately 3.94GB and depending on your internet speed, the download may varies. Once the download completed, you can use any of your preferred tools to burn the image into a DVD disc or you can even copied to an USB flash drive.
I hope you guys enjoy Windows 10 as much as I did and just for your information, you guys did know that Microsoft is going to end the support for Windows 7 right ?
So its time to upgrade to Windows 10.
!!! HAPPY UPGRADING !!!
I wanted to point out that the stable release version is 1511, the "Anniversary" version is 1607, you can check your current system version & build by going to --> START --> Settings --> System --> About.

Now there are several methods available to download this update :-
- Download via Windows Updates.
- Download via Windows Updates Assistant.
- Download the ISO file directly.
Method #2.
This method is relatively also simple and doesn't poses much challenges. But the only drawbacks is that it will required a stable internet connection and it works on a single machine.
1. Just browse to this website Download Upgrade Assistant and click on the "Get the Anniversary Update now" button (as shown below).

This will download the update assistant into your computer, the filename is "Windows10Upgrade28084.exe" and its only 6MB in file size.
2. After download completed you will need to run utility, the utility will automatically detects your current operating system version and build and will auto-select the latest version & build to download. Just follow the on-screen instructions.
3. This utility will only detect & recommend the latest version & build and then proceeds to download the updates from Microsoft server and finally automatically install it for you. You may need to restart your computer 1-2 times for the updates to complete installing.
Note : the advantage of this method is simple for user but only works for a single machine and required a stable internet connection.
Method #3.
This method is to download the ISO file directly and later perform mass deployment to multiple machines and doesn't required an internet connections. Very suitable for enterprises with more than 10 machines & above.
1. To download the ISO, browse to this link Download ISO here.
2. Now at the "Select Edition" section (as shown below), you will need to select the desire edition you need and then click the "Confirm" button.

Note that there is 3 versions available for download :-
- Windows 10.
- Windows 10 N.
- Windows 10 Single Language.
If you resides in Europe, you can download the "Windows 10 N" file.
If you are using other languages such as Japanese, Chinese version then download the "Windows 10 Single Language" file.
I am not going to explain the difference of these versions, you will need to google up yourself. As I'm a resident in Malaysia thus my standard version will just be "Windows 10" file.
3. Next you need to select your preferred language, well "English International" will just works fine for me. Then click on the "Confirm" button to continue.

4. Next you will need to select your architecture (as shown below), either "32-bit Download" or "64-bit Download" version. Just click on the corresponding button and the download will start.

5. The ISO file size is approximately 3.94GB and depending on your internet speed, the download may varies. Once the download completed, you can use any of your preferred tools to burn the image into a DVD disc or you can even copied to an USB flash drive.
I hope you guys enjoy Windows 10 as much as I did and just for your information, you guys did know that Microsoft is going to end the support for Windows 7 right ?
So its time to upgrade to Windows 10.
!!! HAPPY UPGRADING !!!
Nov 7, 2016
Windows 7 - Unable to detect USB drives
Recently a colleague requesting my assistance on why the USB flash drives are not detected in the newer notebook model (eg. HP ProBook 640 G2).
It seems that the UEFI/BIOS are able to detect the USB flash drive & recognized it correctly... it was able to boot (it was configure to boot earlier into Windows 7) but unable to be detected during the installation wizard and not showing in "diskpart" utility.
Showing up in the "diskpart" utility is the first steps of the configuration they need to perform in order to continue to other steps. And they are in dire needs to have this solve the soonest... I think customer is squeezing their neck.... hehehe.... ;p
After some research & studies, I'm suspecting the USB3.0 drivers was the culprits behind the problems as Windows 7 are not bundled with USB3.0 drivers thus causing such problems. In order for the boot-up process to load the USB3.0 drivers and subsequently during the installations wizards to load the same drivers, I must first modify the "boot.wim" & "install.wim" files respectively.
Luckily, I found an utility to help me with it and thus minimizing my time spend for the solution. It's called "DISM GUI" from CodePlex. This utility is a GUI version for "dism" CLI. Much more easier to work with & easy to understand.
Now let's start the fun :-
1. First you will need a working bootable "Windows 7" USB flash drive (I am not going to write another How-To for this, there is already tons of guides on the internet).
2. Create a temporary working folder (eg. D:\WIM).
3. Create two (2) sub-folders inside D:\WIM, first folder is D:\WIM\USB3 and the second folder is D:\WIM\Mount.
4. Now in your bootable USB flash drive (assuming [G:\] is your USB flash drive), browse to G:\Sources folder and copy both boot.wim & install.wim files to the temporary working folder which is D:\WIM.
(Note : This may take a while, so be patience)
5. Once completed, you will need to download the "DISM GUI" utility from CodePlex, you may find the download link here (https://dismgui.codeplex.com/).
6. Next you also need to download the USB3.0 drivers from your manufacturer (recommended) or you can also use a generic drivers from Intel (only for Intel's chip). The download link is here (https://downloadcenter.intel.com/download/25476/Windows-7-USB-3-0-Creator-Utility)
(Note : For the sake of easy download, I have packaged all the required downloads here)
(Note : It is always recommended to download the correct USB3.0 drivers from your manufacturer if its not Intel chip).
7. After you have download the Intel drivers, extract the files and copy only the USB_Drivers\x86 & USB_Drivers\x64 folders to D:\WIM\USB3\ location as shown below.

8. Now run the "DISM GUI" utility "as Administrator", a new windows is open as shown below.

9. At the "Mount Control" tab, click on "Choose WIM" button then browse & select "D:\WIM\boot.wim" file as shown below.

10. Next click "Choose Folder" button and select the mount point to "D:\WIM\Mount" folder. And then click "Mount WIM" button, this may take a while.

11. Once mounted, browse to "Driver Management" tab, then click "Choose Driver Folder" and select "D:\WIM\USB3" folder only. Ensure that both "Force Unsigned" and "Recurse" option is selected, next click "Add Drivers" button to continue, please wait for it to complete.

12. Go back to "Mount Control" tab, click on the "Dismount WIM" button, when prompted to commit changes, just click "Yes" button and wait for it to complete.

13. Now exit the "DISM GUI" utility.
14. Now copy the newly created "D:\WIM\boot.wim" file back to your USB flash drive and replacing the original file (G:\Sources\*.*).
15. Now repeat the same steps from #8 onwards for "D:\WIM\install.wim" file but this time you need to ensure that the correct "Index" is selected.
If you are not sure, click "Display WIM Info" button to show the correct index. This is steps is critical should the ISO image you used to create the bootable flash drives contains other editions of Windows 7 (such as Home, Professional, Enterprise, Ultimate).
Thus selecting the correct "Index" also ensure you are selecting the correct edition to load the USB3.0 drivers into it.

16. You will need to repeat this steps for each edition you want it to have the USB3.0 drivers. Else you just need to only perform this once for the edition of your choice.
17. Once you have commit the changes & unmounts, copy the "D:\WIM\install.wim" file back to your USB flash drive and replacing the original file "G:\Sources\*.*" and once completed you may eject the USB flash drive.
18. At the new computer (laptop in my case), you need to ensure the UEFI/BIOS is configured to be able to boot from USB flash drive. Once booted up via the USB flash drive, you should now be able to use "diskpart" utility and able to detect the USB flash drive itself correctly.
19. Below is the picture taken before the modification, you can see clearly that the USB flash drive is not detected in "diskpart" utility.

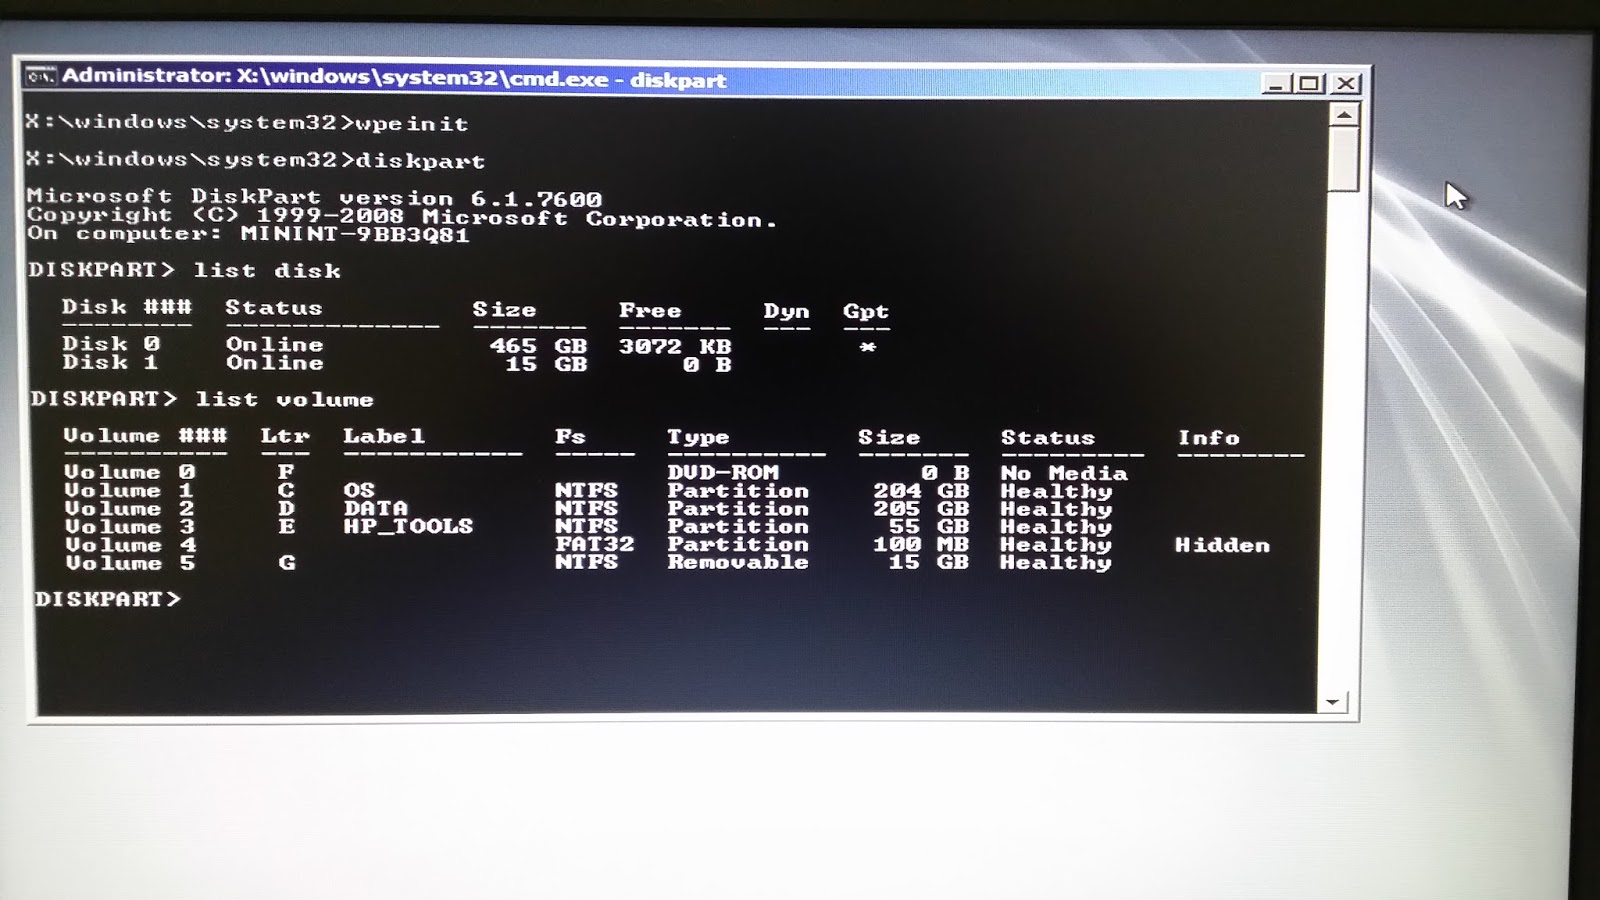
20. Below picture taken is after the modification, where I have added the USB3.0 drivers to both "boot.wim" and "install.wim" files. Here "diskpart" utility detected the USB flash drive correctly and indicated by the assigned [G:\] drive letter.

I hope this will help others as well and thanks for reading.
!!! HAPPY COMPUTING !!!
It seems that the UEFI/BIOS are able to detect the USB flash drive & recognized it correctly... it was able to boot (it was configure to boot earlier into Windows 7) but unable to be detected during the installation wizard and not showing in "diskpart" utility.
Showing up in the "diskpart" utility is the first steps of the configuration they need to perform in order to continue to other steps. And they are in dire needs to have this solve the soonest... I think customer is squeezing their neck.... hehehe.... ;p
After some research & studies, I'm suspecting the USB3.0 drivers was the culprits behind the problems as Windows 7 are not bundled with USB3.0 drivers thus causing such problems. In order for the boot-up process to load the USB3.0 drivers and subsequently during the installations wizards to load the same drivers, I must first modify the "boot.wim" & "install.wim" files respectively.
Luckily, I found an utility to help me with it and thus minimizing my time spend for the solution. It's called "DISM GUI" from CodePlex. This utility is a GUI version for "dism" CLI. Much more easier to work with & easy to understand.
Now let's start the fun :-
1. First you will need a working bootable "Windows 7" USB flash drive (I am not going to write another How-To for this, there is already tons of guides on the internet).
2. Create a temporary working folder (eg. D:\WIM).
3. Create two (2) sub-folders inside D:\WIM, first folder is D:\WIM\USB3 and the second folder is D:\WIM\Mount.
4. Now in your bootable USB flash drive (assuming [G:\] is your USB flash drive), browse to G:\Sources folder and copy both boot.wim & install.wim files to the temporary working folder which is D:\WIM.
(Note : This may take a while, so be patience)
5. Once completed, you will need to download the "DISM GUI" utility from CodePlex, you may find the download link here (https://dismgui.codeplex.com/).
6. Next you also need to download the USB3.0 drivers from your manufacturer (recommended) or you can also use a generic drivers from Intel (only for Intel's chip). The download link is here (https://downloadcenter.intel.com/download/25476/Windows-7-USB-3-0-Creator-Utility)
(Note : For the sake of easy download, I have packaged all the required downloads here)
(Note : It is always recommended to download the correct USB3.0 drivers from your manufacturer if its not Intel chip).
7. After you have download the Intel drivers, extract the files and copy only the USB_Drivers\x86 & USB_Drivers\x64 folders to D:\WIM\USB3\ location as shown below.

8. Now run the "DISM GUI" utility "as Administrator", a new windows is open as shown below.

9. At the "Mount Control" tab, click on "Choose WIM" button then browse & select "D:\WIM\boot.wim" file as shown below.

10. Next click "Choose Folder" button and select the mount point to "D:\WIM\Mount" folder. And then click "Mount WIM" button, this may take a while.

11. Once mounted, browse to "Driver Management" tab, then click "Choose Driver Folder" and select "D:\WIM\USB3" folder only. Ensure that both "Force Unsigned" and "Recurse" option is selected, next click "Add Drivers" button to continue, please wait for it to complete.

12. Go back to "Mount Control" tab, click on the "Dismount WIM" button, when prompted to commit changes, just click "Yes" button and wait for it to complete.

13. Now exit the "DISM GUI" utility.
14. Now copy the newly created "D:\WIM\boot.wim" file back to your USB flash drive and replacing the original file (G:\Sources\*.*).
15. Now repeat the same steps from #8 onwards for "D:\WIM\install.wim" file but this time you need to ensure that the correct "Index" is selected.
If you are not sure, click "Display WIM Info" button to show the correct index. This is steps is critical should the ISO image you used to create the bootable flash drives contains other editions of Windows 7 (such as Home, Professional, Enterprise, Ultimate).
Thus selecting the correct "Index" also ensure you are selecting the correct edition to load the USB3.0 drivers into it.

16. You will need to repeat this steps for each edition you want it to have the USB3.0 drivers. Else you just need to only perform this once for the edition of your choice.
17. Once you have commit the changes & unmounts, copy the "D:\WIM\install.wim" file back to your USB flash drive and replacing the original file "G:\Sources\*.*" and once completed you may eject the USB flash drive.
18. At the new computer (laptop in my case), you need to ensure the UEFI/BIOS is configured to be able to boot from USB flash drive. Once booted up via the USB flash drive, you should now be able to use "diskpart" utility and able to detect the USB flash drive itself correctly.
19. Below is the picture taken before the modification, you can see clearly that the USB flash drive is not detected in "diskpart" utility.

20. Below picture taken is after the modification, where I have added the USB3.0 drivers to both "boot.wim" and "install.wim" files. Here "diskpart" utility detected the USB flash drive correctly and indicated by the assigned [G:\] drive letter.
I hope this will help others as well and thanks for reading.
!!! HAPPY COMPUTING !!!
Oct 4, 2016
Exchange Server 2013 - POP3 Mail Collector using MDaemon
The new Microsoft Exchange Server 2013 no longer supports POP3 mail collection from a 3rd party hosting provider. It have caused some difficulties for small & medium enterprise where they still replies heavily on this provider for their business email communications.
Some hosting provider does supports IMAP collections while some are not, this is because the server(s) the hosting provider is using was unable to support such protocols (due to whatever the reasons), so you are stuck in the middle to resolve this problems.
So either you change the hosting provider (which may incurred more cost) or you use an old Exchange server that still supports POP3 protocols (which you will not have the latest features & functions).
There are many solutions out in the internet that provide a workaround for this and I find many to be either ridiculous, too little functions/features, too complicated to configured or just plain unstable due to whatever the reasons.
I found that Quantum Software Solutions Exchange Connector to be the simplest software to use & to configure but due to unknown reasons, the software been giving me a lot of problems lately when my users reached more than 50 users and also I need to constantly monitor the server to manually restart it should it become freezes. It also causes missing emails, unable to send emails to my Exchange server and many more.
So I tried another solution based from my past experiences by using MDaemon Mail Server which I have deployed many times to many clients successfully. And some are still running fine without any problems until today..... now that's what I called stability.
After some trial and error, I have managed to make it work & to cut the story shorts below are some examples of the configurations :-
1. Install MDaemon Mail Server (you may need to check the compatibility list & plan your deployment accordingly). Just follow the on-screen instructions.
2. Goto --> "Setup" --> "Primary Domain" options --> "Domain/ISP" tab as shown below.
a) Domain name = [any local domain name will do, it must NOT be your actual domain].
b) HELO domain = [same as above]
c) Domain IP = [the IP address of the host you are running MDaemon].
d) ISP or smart host's IP or domain name = [your exchange server's IP address].

Note : DO NOT USE your company's actual domain name (eg. company.com.my), you must configure it to use something else (eg. company.local). You will understand why later when I describe how the mail flow works.
3. Goto --> "Ports" tab as shown below and change the "Create outbound SMTP events using this TCP port" option to something that are not standard (eg. 524).

4. Leave the rest configurations as default and click "OK" button.
5. Now goto --> "Setup" --> "Even Scheduling" and configure as shown below then click "OK" button when done.

Note : Some hosting provider limit time access to their server & to avoid lockup, ensure you configure this accordingly to your hosting provider, if in doubt check with them.
6. Now login to your Exchange's ECP, goto --> "mail flow" options.

7. Then goto --> "receive connectors" tab.

8. You will see a list of default transports, click on the plus sign "+" as show below.

9. At the "General" option --> "*Name" box, create a sensible name (eg. POP3 Receive Connector) as shown below.

10. Next goto --> "security" option and ensure its selected as per below options.

11. Then goto --> "scoping" option, configure as below & click the "save" button when done.
a) Ensure the IP address matches your LAN (eg. 192.168.0.*/24).
b) Ensure the port number is specified (eg. 524).
c) Ensure your Exchange server's FQDN is correct (eg. server.company.com.my).

12. Now proceed to logout from your ECP and return back to your MDaemon server, we are now ready to create users for MDaemon (I assume you have already created all the required users in Exchange server).
13. Goto --> "Accounts" menu --> "Accounts Manager" --> click "New" button, then it will display another windows as below. Under "Account" tab configure as shown.
a) Full name = Daniel Cheah
b) Mailbox name = daniel.cheah
c) @ = company.local
d) Account Password = [Password]

14. Browse to "Forwarding" tab --> select "This account is currently forwarding mail" option. Then key-in the FQDN email account (eg. username@company.com.my) as shown below.

15. Next is goto --> "MultiPOP" tab --> select "Enable MultiPOP mail collection for this account" option as shown below.

16. Now type-in your hosting provider's mail server details (eg. pop.provider.com.my) and the username & password (which you have already created in hosting provider's mail server) as shown below, once done click the "Add" button.

17. Once added, you will be able to see the list created as shown below, now click "OK" button to exit.

18. Now you can close all open windows and try send a test email, I will suggest using your own personal Hotmail or Gmail for this testing purposes to ensure MDaemon are able to collect the emails from the hosting provider's mail server and then automatically forward it to your local Exchange server accordingly.
The in your computer, open Microsoft Outlook (which you already configured to connect to your local Exchange server) and check whether you have receive the test email or not. If everything is correctly configured you should be receiving it around 5 mins time.
19. Below is a sample diagram of the incoming mail flow using Quantum Software Solution's Exchange Connector (QSS EC).

20. Below is a sample diagram of the incoming mail flow using MDaemon server.

21. From comparisons both diagram is almost the same but bear in mind that MDaemon is a full fledge server unlike QSS EC which are not.
So how does QSS EC works ?
22. Now comparing to MDaemon's processing.
23. As for the sending emails out, clients will be using the IMAP4 protocols to send emails to your local Exchange server and then the Exchange server will send the emails out directly. It's the same for both QSS EC & MDaemon.
Of course you can also configured your Exchange server to forward it to your hosting provider's SMTP server and this is up to your decisions. But do keep in mind about the hosting provider's server where it might be lockup due to too many SMTP request from the same IP & thought its was a "spam overflow/DoS" attacks.
That's all and HAPPY EMAILING !!!
Some hosting provider does supports IMAP collections while some are not, this is because the server(s) the hosting provider is using was unable to support such protocols (due to whatever the reasons), so you are stuck in the middle to resolve this problems.
So either you change the hosting provider (which may incurred more cost) or you use an old Exchange server that still supports POP3 protocols (which you will not have the latest features & functions).
There are many solutions out in the internet that provide a workaround for this and I find many to be either ridiculous, too little functions/features, too complicated to configured or just plain unstable due to whatever the reasons.
I found that Quantum Software Solutions Exchange Connector to be the simplest software to use & to configure but due to unknown reasons, the software been giving me a lot of problems lately when my users reached more than 50 users and also I need to constantly monitor the server to manually restart it should it become freezes. It also causes missing emails, unable to send emails to my Exchange server and many more.
So I tried another solution based from my past experiences by using MDaemon Mail Server which I have deployed many times to many clients successfully. And some are still running fine without any problems until today..... now that's what I called stability.
After some trial and error, I have managed to make it work & to cut the story shorts below are some examples of the configurations :-
1. Install MDaemon Mail Server (you may need to check the compatibility list & plan your deployment accordingly). Just follow the on-screen instructions.
2. Goto --> "Setup" --> "Primary Domain" options --> "Domain/ISP" tab as shown below.
a) Domain name = [any local domain name will do, it must NOT be your actual domain].
b) HELO domain = [same as above]
c) Domain IP = [the IP address of the host you are running MDaemon].
d) ISP or smart host's IP or domain name = [your exchange server's IP address].

Note : DO NOT USE your company's actual domain name (eg. company.com.my), you must configure it to use something else (eg. company.local). You will understand why later when I describe how the mail flow works.
3. Goto --> "Ports" tab as shown below and change the "Create outbound SMTP events using this TCP port" option to something that are not standard (eg. 524).

4. Leave the rest configurations as default and click "OK" button.
5. Now goto --> "Setup" --> "Even Scheduling" and configure as shown below then click "OK" button when done.

Note : Some hosting provider limit time access to their server & to avoid lockup, ensure you configure this accordingly to your hosting provider, if in doubt check with them.
6. Now login to your Exchange's ECP, goto --> "mail flow" options.

7. Then goto --> "receive connectors" tab.

8. You will see a list of default transports, click on the plus sign "+" as show below.

9. At the "General" option --> "*Name" box, create a sensible name (eg. POP3 Receive Connector) as shown below.

10. Next goto --> "security" option and ensure its selected as per below options.

11. Then goto --> "scoping" option, configure as below & click the "save" button when done.
a) Ensure the IP address matches your LAN (eg. 192.168.0.*/24).
b) Ensure the port number is specified (eg. 524).
c) Ensure your Exchange server's FQDN is correct (eg. server.company.com.my).

12. Now proceed to logout from your ECP and return back to your MDaemon server, we are now ready to create users for MDaemon (I assume you have already created all the required users in Exchange server).
13. Goto --> "Accounts" menu --> "Accounts Manager" --> click "New" button, then it will display another windows as below. Under "Account" tab configure as shown.
a) Full name = Daniel Cheah
b) Mailbox name = daniel.cheah
c) @ = company.local
d) Account Password = [Password]

14. Browse to "Forwarding" tab --> select "This account is currently forwarding mail" option. Then key-in the FQDN email account (eg. username

15. Next is goto --> "MultiPOP" tab --> select "Enable MultiPOP mail collection for this account" option as shown below.

16. Now type-in your hosting provider's mail server details (eg. pop.provider.com.my) and the username & password (which you have already created in hosting provider's mail server) as shown below, once done click the "Add" button.

17. Once added, you will be able to see the list created as shown below, now click "OK" button to exit.

18. Now you can close all open windows and try send a test email, I will suggest using your own personal Hotmail or Gmail for this testing purposes to ensure MDaemon are able to collect the emails from the hosting provider's mail server and then automatically forward it to your local Exchange server accordingly.
The in your computer, open Microsoft Outlook (which you already configured to connect to your local Exchange server) and check whether you have receive the test email or not. If everything is correctly configured you should be receiving it around 5 mins time.
19. Below is a sample diagram of the incoming mail flow using Quantum Software Solution's Exchange Connector (QSS EC).

20. Below is a sample diagram of the incoming mail flow using MDaemon server.

21. From comparisons both diagram is almost the same but bear in mind that MDaemon is a full fledge server unlike QSS EC which are not.
So how does QSS EC works ?
- It collects emails from hosting provider's server via POP3 protocols.
- Verify recipients validity by cross checking with Active Directory via AD/LDAP protocols.
- If correct then forward the emails to your local Exchange server via IMAP4 protocols.
- Clients collects emails from Exchange server via IMAP4 protocols.
- If failed, then it will forward to the "Mail Master/Administrator" mailbox.
22. Now comparing to MDaemon's processing.
- Collect emails from hosting provider's server via POP3 protocols.
- Verify recipients with MDaemon's local DB (that is why the MDaemon server must not use the same domain name).
- Auto forward emails to "Smart Host" (which is your local Exchange server) via SMTP protocols on custom port.
- Exchange server verify the recipients & send to local mailboxes.
- Clients collects emails from Exchange server via IMAP4 protocols.
23. As for the sending emails out, clients will be using the IMAP4 protocols to send emails to your local Exchange server and then the Exchange server will send the emails out directly. It's the same for both QSS EC & MDaemon.
Of course you can also configured your Exchange server to forward it to your hosting provider's SMTP server and this is up to your decisions. But do keep in mind about the hosting provider's server where it might be lockup due to too many SMTP request from the same IP & thought its was a "spam overflow/DoS" attacks.
That's all and HAPPY EMAILING !!!
Subscribe to:
Posts (Atom)