Now I'm not going to explain what is VM (Virtual Machine), for those noob please "Google" for more information. Or you may want to head to MSDN for some study.
Before we start, we need to ensure our existing system hardware able to support and run Hyper-V. The requirements as below :-
- Virtualization Technology (VTx)
- Virtualization Technology for Directed I/O (VTd).
- Data Execution Prevention (DEP).
- Second Level Address Translation (SLAT).
- Intel's Extended Page Table (EPT) / AMD's Nested Page Table (NPT).
- Minimum 8GB physical RAM, Hyper-V will dynamically allocate at least 4GB RAM (the more the better).
- Windows 10 Professional / Enterprise 64-bit OS.
1. Check your BIOS/UEFI is supported or not. Please note that as my computer is a Hewlett-Packard so invoking the UEFI is by pressing [F10] key, yours might be different and depending on manufacturer.
2. Now run --> CMD and type --> systeminfo --> [ENTER] key.
Please note that all displayed option must be "Yes" as shown above.
You can also download this tool CoreInfo from SysInternals for a more in depth check on your processor. After running it, look for the following information as shown below.
Note the "*" (asterisk) sign means the processor is supported while the "-" (minus) sign means its not supported.
3. Goto --> Control Panel --> Programs and Features icon --> Turn Windows features on or off option.
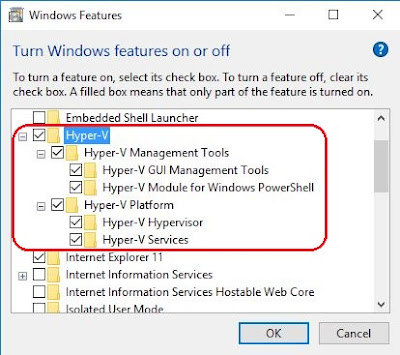
4. Ensure you select all the "Hyper-V" features available as shown below and click "OK" button.
Or you can also use the following cmdlet to install Hyper-V.
enable-WindowsOptionalFeature -Online -FeatureName
Microsoft-Hyper-V –All
|
When prompted, please restart your computer.
6. The following windows will be displayed, now its up to you to explore around and familiarized yourself first.
On my next post, I will be showing on how to create a VM especially how to create a "Windows XP Mode" VM in Hyper-V.
VIRTUALIZED EVERYTHING !!!


Nice to see a blog dedicated to Hyper-V , good luck. Keep continuing updating such kind of interested post here.
ReplyDeleteThanks, appreciates it. Will try my best.
Delete