Now since your VoIP server is up & running and you have completed creating the "Extensions", it's time to install the softphone in your computer.
Depending on which softphone you choose, the configurations might be different. I'm using both Zoiper and X-Lite Free on my computer. Now take note that X-Lite does have version for Android & iOS devices but you'll need to pay for it. While Zoiper on the other hand is FREE for all types of devices.
Zoiper Softphone.
1. Download & install Zoiper.
2. Once installed, run the program. Goto --> Settings --> Preferences menu.
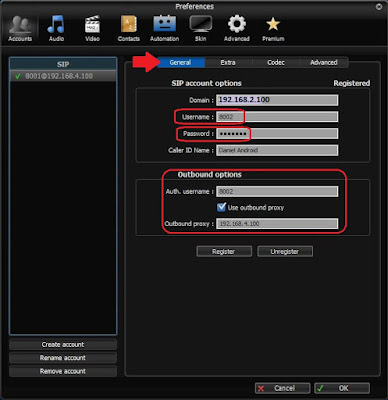
3. In the General tab, type-in the IP address of the FreePBX server, your username, password. Configure the same also for the "Outbound options" as show below.
4. Now at Advanced tab, type-in your FreePBX IP address into the "STUN options" as shown below. Once done click "OK" button.
5. You may need to wait for a few seconds before the softphone is registered with the server.
6. Once completed, you can continue to setup the same on another computer and the only differences is the extension number.
Now for some extra note, if you subscribe to Zoiper's VoIP package, the STUN options are already pre-configured thus no changes required. But in my case, I setup my own server thus the changes must be configured according to my FreePBX server's IP address.
Also if you have setup DDNS like me, configuring your mobile devices is slightly different, whereby instead of specifying the IP address, you must specify the FQDN of your DDNS services (eg. myfreepbx.dyndns.net)
HAPPY COMPUTING !!!


No comments:
Post a Comment