Dec 8, 2015

Notebook - HP EliteBook Folio 9470m UltraBook (Disassembly)

This is just a references for disassembling the HP EliteBook Folio 9470m UltraBook model. You may not need to go to the extend of dismantling to the "bare" for common upgrades like RAM and HDD or mSSD, but just in case some genius out there decided to have a go (its not for faint hearted, be warned).

1. Push side way to remove the notebook's battery as shown below.

2. Remove the screws as shown to disclose the storage's bays (2 screws).


3. Once the cover is removed, it will reveal the storage bays which consist of 1 x mSSD slot and 1 x SATA HDD bay. Depending on the country of purchase, some models may comes with mSSD or HDD only or maybe both.

Note : Some model comes with mSSD Cache 32GB.

mSSD Location.

HDD Bay Location.

4. Remove the screws as shown to reveal the RAM slots and other components.


5. Once the cover is removed, you can now view the keyboard's screws as shown below (3 screws).


6. Once the keyboard's screws have been removed, turn over and slowly and very carefully to remove the keyboard. Please take note that the keyboard have an interlocking mechanism (or notches), so removing it must be very slow, careful and a steady hand.


Remarks : Becareful not to damage any connectors and its ribbon cables shown below, it will affects keyboard's functionalities.

Remarks : Below picture is the exact location of the keyboard's notches location.


7. Once the keyboard is removed, turn back to the bottom. Now proceed to remove all screws as shown, becareful of the screws length where some is shorter than the normal. A total of 19 screws.

Note : You need to peel off the CMOS battery which is sticked onto the chassis and ensure also the antenna cables is disconnected before removing the mid chassis.


8. Once the "Mid Panel" is removed, it will disclose the mainboard of the notebook. Proceed to disconnect all the connectors as shown below (4 Connectors).


9. Once all the connectors is disconnected, now we need to remove the mainboard's screws first as shown below (2 screws).


10. Once the mainboard's screws is removed, now we need to remove the "CPU's Fan" as shown below (1 screw) and its connector.


11. Now once the "CPU's Fan" is removed, we can proceed to remove the mainboard slowly. Note that it will be a bit tricky as the "Audio/Headphone" port is stuck in between the base chassis. The below picture shows that the mainboard removed.


12. The "LCD Screen" is still attached to the chassis, to remove it you must remove the screws as show below (4 screws). But take note before removing the screws you may need to slightly open the screen at 90 degrees angle for an easier approach.


13. Now the "LCD Screen" is separated from the base chassis. This is how it looks like once the screen is separated.


14. Now I'm not going to show how to remove the LCD screen as this will be quite easy to perform, but be aware of the "LCD's Inverter" board which might cause some electrical shock. Also a mishandling of the screen will rendered it either crack or malfunction.


Also since I've successfully dismantled the notebook, I've took the liberty to label most or commonly known parts as shown below.


Now I will not recommend this procedures unless really necessary and will definitely void all warranty that applies. So do this at your own risks.

Happy Computing !

Nov 23, 2015

Notebook - Lenovo IdeaPad Z500 (Disassembly)

I've no idea why Lenovo called it IdeaPad and I've no idea why in world they doesn't allow access to the common parts like HDD & RAM.

Shouldn't the most common components/parts that are easily available for upgrades should be also easily accessible ?

I took a hard time trying to figure out how the heck to remove the back cover to access the RAM which I was trying to upgrade, fortunately with years of disassembly of notebooks around my belt I did managed to remove the cover and have access to the RAM.

I find it very ridiculous to go all the way to remove the back cover just to install/upgrade a RAM, why Lenovo can't think straight & just allow a particular section accessible by user for the upgrades (just like HP) ?  C'mon now in this era of technology, even my daughter knows how to handle a common upgrades... why Lenovo doesn't allow the access ?

Nevertheless, I'm not that easily discouraged person..... so here goes the :-

1. At the back cover of the notebook, there is hidden screws underneath the rubber stands.


All the screws including those hidden is highlighted here.
Hidden beneath the rubber stand.

 2. Before you can remove the back cover, there are more hidden screws located behind the keyboard.

Remove the keyboard, simple peel from the each sides carefully.
Remove screws as highlighted here.
3. Now you can remove the ODD (Optical Disc Drive) or more commonly known DVDRW drive. Removing the drive will disclose more hidden screws.

The ODD after removed.
 
More hidden screws.
 
 4. Then you need to carefully remove the back cover, you must be very careful at this stage as not to break any of its interlock mechanism, else you will find it difficult to secure the cover back.

5. Once the cover is removed, it will revealed the mainboard. I took the liberty to label each common components in case that someone might need to change/upgrade other components as well.


 6. This is the existing RAM 4GB found inside the notebook. Some how the label was not very helpful at all in determining the RAM's specifications, I've to googled again.


7. This is the new RAM I've bought from my trusted vendor in Plaza Low Yat, C-Zone shop. A Kingston 8GB PC3-12800 CL11 (2 pcs).


8. The RAM have been successfully installed and Windows is booting like normal, the new 16GB total RAM seems to be in effects immediately where Win8.1 is booting at a much faster rate than previous.

Seriously, its took me about 30-45 mins just to disassemble and assemble it back. Lenovo have to re-think or re-design their notebooks, especially for consumer models.

Come on guys (Lenovo), at the age and era of advanced technologies these common components can be simply upgraded without any hassles.

Happy Computing !

Nov 7, 2015

TM - New DNS Server Address

I think some of you might have encountered some internet disruptions services, especially those using Streamyx and Unifi services.

Actually TM (Telekom Malaysia Bhd.) have announced in their website that the age old DNS servers is now in upgrading and they have changed the IP address of their DNS servers.

Previous DNS Server IP address :-
  • Primary DNS = 202.188.1.5
  • Secondary DNS = 202.188.0.133
The new changes only affect the Primary DNS server, thus the new configuration as below :-
  • Primary DNS = 1.9.1.9
  • Secondary DNS = 202.188.0.133
TM have advised to configure your router to "auto-assign" in the DNS options, but some of us preferred to manually configure this, if that's the case please re-configure the DNS as shown above.

For more information, please visit TM's website here.

Oct 20, 2015

Windows 7 - WSUS Offline Updater

Recently there's been several request from end users requesting for Windows Update/Patches, it's not a problem doing the updates..... the problems arises where you have to click every computers to run the updates and its a repetitive tasks.

Also every computers is downloading the same updates over and over again, it was a bandwidth waste. So there must be much more simpler way in doing this (beside using Microsoft Windows Server Update Services or commonly know as WSUS).

I found a few alternatives available in the internet, this is the one that I preferred due to the following reasons :-

  1. Auto download catalogue of update list.
  2. Auto download updates (as per your selections).
  3. Options to download others updates (such as .NET Framework).
  4. And able to perform single click installation on clients.
  5. No installation required both on the servers & clients (portable software).
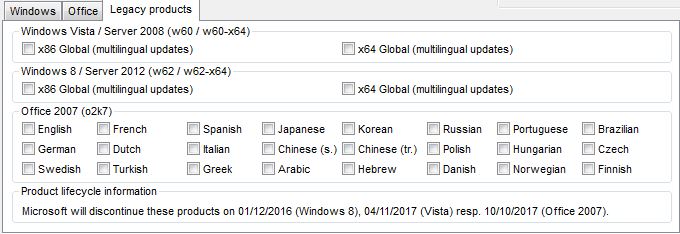
Now a few screenshots below shows a few of the many selections available. You may download this software here.


Oh by the way... did I mentioned this is FREE ? And if you find it useful, some donation to the developer will help to continue his efforts.
 
Happy Computing ! :)


Oct 12, 2015

Windows XP - Serial (RS-232) Port Emulator

Again my friend have requested my help to solve yet another communication port issue and this time its a RS-232 (COM) port or mostly known as COM1 or COM2 ports.

The problems arises when a software always detect the availability of the port each time it starts which if failed will return an error message. To avoid this annoying message the workaround is to install a COM1 port (which the software detects) and sadly Windows doesn't allows that.

Although you may be able to install the port (manually), Windows will try to detect the physical port availability and if failed it will give you a "bang sign" (exclamation mark) in your device manager.

The simplest workaround is to emulate the port hence the word "Emulator", I've found a FREE program that just works the magic.

Download the program here courtesy of HW-Group.

The installations is very easy and depending on the operating environment, you need to select accordingly, mine is "Standalone Application".


After installation complete, just run the application and configure accordingly, as I need it to emulate "COM1" port the following was my settings.


Note : the "IP Address" was a loopback address, this is to avoid any IP Address conflict in the network.

Now you might want the emulator to start automatically each time the computer startup and also each time the program start it automatically create the port for you.

Select "Settings" tab --> Select (tick) --> "Create VSP Port when HW VSP Start-up" option.


Now you also need to add it into "Startup" folder for the program to auto launch each time :-

1. Create a shortcut of the program.

2. Move it to :-
--> For Windows XP = "C:\Documents and Settings\All Users\Start Menu\Programs\Startup" folder.
--> For Windows 7 = "C:\ProgramData\Microsoft\Windows\Start Menu\Programs\Startup" folder.

3. Now Right-click on the shortcut --> Select "Properties" --> at the "Shortcut" tab --> under "Run" dropdown box --> Select "Minimized" --> Click "OK" button.


Note : This is to ensure the program doesn't pop-up / displayed during start.

Of course this small utility have more capabilities but mostly are designed to work with its own products from HW-Group. There are many virtual port emulator available and with tons of features and functions, but I just need to emulate the port to avoid the error message thus a simple yet easy to configure utility is the main objective.

Happy Computing !

Oct 6, 2015

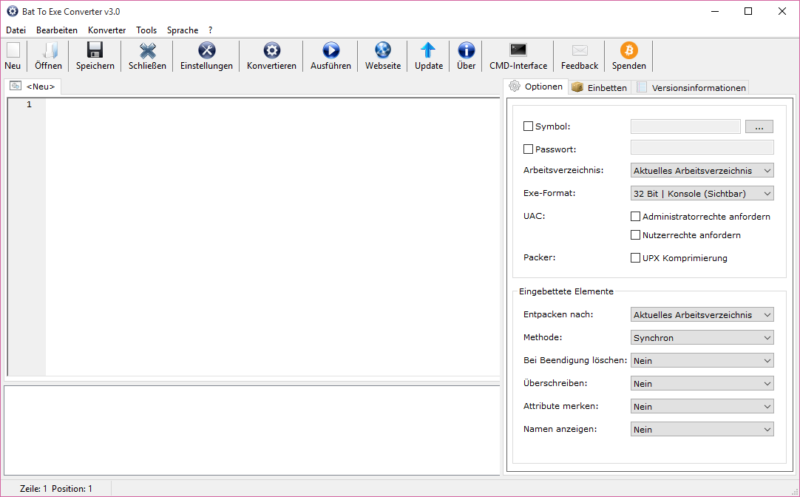
Batch - Batch to EXE Converter

Well as the saying goes "All good things must be share..." and so I'm sharing a tools that I find it very useful and convenient.

Ever created a batch file (.bat) that you don't want other people to mess with it ? Or simply you just wanted to hide the commands ?

There's a lot of free tools available when you google it but none are free for commercial use or there's no limitation on usage. I'm recommending using F2KO utility to convert your batch file into an .exe file format.

It's very simple to use and no installations required, do give it a try and there's others of cool stuff to in his website.

Oct 4, 2015

CloneZilla - Create Bootable HDD

If you know Norton Ghost then you must know CloneZilla, same functions as Ghost (cloning) but with supports on the latest UEFI system.

Now in CloneZilla official website, they only provide you a tutorials on making the USB flash drive bootable but you still need to plugin your external USB HDD for the "/Home" drive mounting (that's where you save all your images).

Well I've created a video on how to make your external USB HDD to be bootable and in the same time have the images stored.


Happy Cloning ! :)