Jan 30, 2016

Windows 10 - Uninstall Built-In Apps & Reinstall All Again.

Well many of you know by now that Windows 10 comes with lots of built-in apps, some you may find it useful while some to be ridiculous. For an IT Pro like me, I find these apps to be nonsense and waste of resources.

So I've tried to uninstall these built-in apps, while some allows me to uninstall it like normal but others seems doesn't allow me to do so.

1. Goto --> "Start" --> "Settings".


2. Click --> "System" settings.


3. Select --> "Apps & features" tab as shown below.


As I've mentioned earlier, some apps allow normal uninstall process as shown in below screenshot.


While some doesn't have this option as the "Uninstall" button is greyed out as shown in below screenshot.


To uninstall these apps, we need to do it the hard way, by using cmdlet in "PowerShell", please follow these steps below :-

1. Goto --> "Start" --> Type --> "PowerShell". Right-click --> "Windows PowerShell" --> Select --> "Run as administrator" option. When prompted by the UAC, just click "Yes" button to continue.


2. Now you see a new window opened, it does look similar to the normal "CMD" window but don't be confuse, this is the all new "PowerShell" (it is meant to replace the age old command prompt).


3. Now depending on your requirements, you can choose to uninstall all the built-in apps or selectively only certain apps. Use the following cmdlet to uninstall those apps.

Syntax :
get-appxpackage [package name] | remove-appxpackage
 

Now the "[package name]" will be the apps' name variables, you can refer to the list below for their name.
Built-In Apps
[package name]
3D Builder
*3dbuilder*
Alarms and Clock
*windowsalarms*
Calculator
*windowscalculator*
Calendar and Mail
*windowscommunicationapps*
Camera
*windowscamera*
Get Office
*officehub*
Get Skype
*skypeapp*
Get Started
*getstarted*
Groove Music
*zunemusic*
Maps
*windowsmaps*
Solitaire Collection
*solitairecollection*
Money
*bingfinance*
Movies & TV
*zunevideo*
News
*bingnews*
OneNote
*onenote*
People
*people*
Phone Companion
*windowsphone*
Phone
*commsphone*
Photos
*photos*
Store
*windowsstore*
Sports
*bingsports*
Voice Recorder
*soundrecorder*
Weather
*bingweather*
Xbox
*xboxapp*
Scan
*windowsscan*
Twitter
*twitter*
Microsoft Sway
*office.sway*
Xbox One SmartGlass
*xboxonesmartglass*
Microsoft Messaging
*messaging*

Example of the cmdlet :-


4. Now once all the apps have been uninstalled successfully, you can re-confirm again by browsing the "Apps & features" list again. The apps should no longer be available in the list.

5. Please be aware that some apps cannot be uninstall even using the powershell cmdlet, this might be due to Windows 10 required those apps to be working correctly thus even though you tried to uninstall it, it will return an error message. Below are the list of apps that cannot be removed.


Built-In Apps
Remarks
Contact Support
Cannot be removed.
Microsoft Cortana
Cannot be removed.
Microsoft Edge
Cannot be removed.
Windows Feedback
Cannot be removed.

PS : Some guys did managed to uninstall "Microsoft Edge" but there's no feedback from them about the stability of Windows 10. (Please do let me know if anyone managed to uninstall it and yet Windows 10 is stable or in working condition).

6. Now if you wanted to install back those apps, just use the below cmdlet.

Syntax :
Get-AppxPackage -AllUsers| Foreach {Add-AppxPackage -DisableDevelopmentMode -Register “$($_.InstallLocation)\AppXManifest.xml”}


I hope the above will be useful someone. Although the listing provided here may not be applicable to some countries but this is what's been installed on my computer.

Happy Computing !!!

Windows 10 - Privacy Settings

Now some of you may have upgraded to Windows 10 (just like myself), did you guys know that the "Privacy Settings" in Windows 10 is somehow enabled by default ?

Well, I stumbled upon a very excellent video by this guy "Barnacules" in YouTube website and find very interesting. For the sake of easy referencing I've make a link of the video here.


This video will guide you on how to permanently disabled all those privacy settings plus some explanations to it also. Please do watch the video until the end and you will understand how Microsoft forces us on the privacy settings.

Happy Computing !!!

Jan 21, 2016

Windows 10 - Taskbar in Dual Monitor Display

With the recent upgrade to Windows 10, I've noticed that whenever I connect my lappy to an external monitor there is a taskbar shown on the monitor. The same taskbar I have on my primary display.

Now most of the times I do not wish to display the taskbar to the public view (think of it as connecting it to a projector where you're doing presentation). So you really doesn't want the audiences to know what applications or programs you are running in the background.

Unlike Windows 7 where the taskbar is disabled by default, Windows 10 make it displayed as default, Follow this very simple and easy steps to disabled it.

1. Right-click on the taskbar --> Select --> Properties.


2. Just unchecked the tick mark at "Show taskbar on all displays" option and its disabled.


Now is very simple and easy right ? This also works if you have more than 2 displays.

Happy Computing !!!

Windows 10 - Windows Update Option

After upgraded my notebook to Windows 10 Pro 64-bit, the Windows Update no longer provided me the options how it should look for updates/patches from Microsoft.

Sometimes when you just need full bandwidth of the internet and then this Windows Update kicks in to automatically starts downloading the updates without your notice then it will be wasting your time and on the internet bandwidth. As myself often use TeamViewer to remote in to server(s) or workstation(s), this poses a problems to me as the connection will be slow and lagging.

There is a workaround for this but this only applies to Win 10 Pro & above, lower version like Home Edition are not available :-

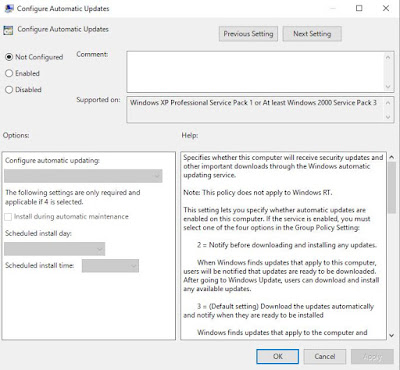
1. Run --> "gpedit.msc" --> Browse to --> HKLM\Administrative Templates\Windows Components\Windows Update. Look for "Configure Automatic Updates" policy.


2. The default value is "Not Configured", select --> "Enabled" option.


3. Now you select your desired value in the drop-down box as shown below, as I need it only to notify for the download & install, I've chosen "Notify for download and notify for install" value. Of course you can select "Allow local admin to choose setting" value depending on your environment.


4. Once all is done, just proceed to click "OK" button to close all windows and restart your computer for the policy to take effects. You can also use the following command line for it to take effects without restarting your computer.


C:\>gpupdate /force


5. Once the policy been updated, you will see something similar message displayed as shown below.


Happy Computing !!!

Windows 10 - Wifi Auto Disconnect

Recently my notebook's wifi always auto disconnect itself after certain period of use. This have never happens before, I'm suspecting either my Wifi Card is having some sort of failure or maybe its settings. But nevertheless, I'm going to try on the settings first prior to any parts replacement.

So after some thoughts which settings that might have caused this problems, I found that maybe the wifi card keeps on searching for the nearby available wireless hotspots and which might have causes it to auto disconnect the current connection. Here is what I did :-

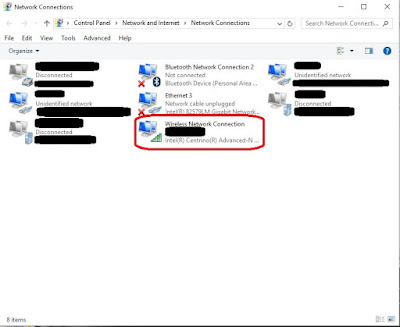
1. Goto --> All Control Panel Items --> Network and Sharing Center --> Change adapter settings.


2. Select your wireless adapter as shown below.


3. Right-click on the wifi adapter --> Select --> "Properties" option.


4. Click on the --> "Configure" button.


5. Goto to "Advanced" tab --> Browse for "Roaming Aggressiveness" property (this property name maybe different varying by wifi card manufacturer) --> Change the "Value" option in drop-down box (the default value is "Medium" for my wifi card).


6. I changed it to "Medium-Low" value as shown below for further testing.


7. The value depends on your current situation, if you select "Highest" value means that you are telling the wifi card to constantly scan your surrounding area for the best wireless hotspots available which will consume more battery power (which usually not recommended). Thus I do not wish it to scan for the best available connection when its already connected to the chosen connection.

This settings is only meant for further evaluation and if the problems still occurs then a hardware changes maybe required. Also you might want to try installing the latest drivers version for the wifi card just in case.

Happy Computing !!!

Jan 16, 2016

Windows 10 - Download Windows 10 ISO

Now Windows 10 have been released for some time now, some of you may have upgraded to it via the "Windows 10 Upgrade" notification, while some preferred to download it first and upgrade later.

I planned to have Windows 10 install on all my notebooks (whichever is eligible & oh you do know that not all computers are eligible right?), anyway I would like to download once and install multiple machines at a later time.

Now the only drawback with the notification is that the file downloaded is an *.esd file which it is impossible to use for another machine, so I need something like an *.iso file so I can either create a bootable USB flash drive or just burn it on a DVD disc.

Sadly Microsoft's website doesn't provide such download (or is it?), a workaround is required and after much study from the internet there is a way to download the iso file from Microsoft's website.

1. You will need "Google Chrome" browser to be installed first, this browser is used for the downloading of the iso file.


2. Now I presume you have install the "Google Chrome" browser in your computer, let's proceed to open it. After that press [F12] key to invoke the "Developer" mode, you will see something similar as shown.


3. Now click on the "mobile" icon as shown.


4. Then select the appropriate model as shown, I just use "Apple iPad" for this tutorial and it just works.

5. Copy this link "https://www.microsoft.com/en-in/software-download/windows10" (without the quotes) and paste into the URL bar as shown.


6. Once loaded, you will have a page displayed similarly. Now select "Windows 10" and click "Confirm" button to continue.


7. Afterward it will reload with another option displayed, just select your preferred language of media. For this tutorial I will only be using "English" as default, click "Confirm" button to continue.


8. Now you will need to select your preferred architecture, be it "32-bit Download" or "64-bit Download". I always preferred a 64-bit version so I've proceed to download 64-bit instead.


9. Once you have click the "64-bit Download" link, google chrome will start the download automatically and the status is displayed at the bottom of the browser as shown.


10. The download will take some time to complete and depending on your internet bandwidth.

Once the download have completed, you may create your own bootable disc or USB flash drive (whichever you preferred). Now I do not encourage nor endorsed piracy, this steps is only for those who have purchased legal license from Microsoft or from its Affiliates and that your computer is eligible for the upgrades (the Windows 10 upgrade notification).

There are no CD-Key or Product Activation Key in the media, Windows 10 will activate itself if your system is eligible for the upgrade and if you think your computer is eligible and yet it cannot be activated, please do contact your vendor/manufacturer or Microsoft for support.

Now on a side note, please do remember to backup your data prior to any OS installation to avoid any mishaps.

Happy Computing !!!

Jan 9, 2016

Server - Configuring DNS Forwarder (Windows Server 2012 R2)

The recent changes of TM's (Telekom Malaysia) DNS server IP address to 1.9.1.9 have caused much problems, especially when you have your own domain running in the network.

After much time spend going through Microsoft TechNet & MSDN websites, I have found a simple solution to this.

How it works is that all DNS queries will definitely be going to the local DNS (else your local client will not be able to use the local services provided, such as file & printer sharing), as such local DNS queries will be responded by the local DNS server but other or external queries will return an error.

Now I assume you already have a local DNS server setup & running within your domain, just follow this steps :-

1. Open the "DNS Manager" console, goto START --> Control Panel --> Administrative Tools --> DNS.


2. Right-click on your DNS server and select "Properties" option.


3. Goto "Forwarders" tab and click the "Edit" button.


4. Add the DNS IP address as shown, you can also arrange which is the preferred DNS server by using the "Up" and "Down" button.


5. Once all is done, just click "OK" button to close all open windows. Now it does take sometimes for the DNS server to sync its database so be patient for it. Mine took about 15 mins to 30 mins for it to complete.

If you add an extra DNS server (like me, as I don't want to mess with my AD-DS server), you will also need to ensure that your DHCP server is providing the correct DNS address to all your clients in the network. Below diagram is just an example of how it works :-


Happy Computing !!!

Jan 7, 2016

Windows 7 - Photo Viewer Slideshow

Did you know that your Windows 7 own Photo Viewer utility can run "slideshow" on all the photos that reside there ?

Quite simple and easy, just double-click on any of the photo to start the Photo Viewer first, then press [F11] key to start the slideshow function.

If you have a secondary monitor (like me) then you might want to run the slideshow on a secondary monitor instead while you can still continue work on your main monitor. Here's how :-

1. Start --> Photo Viewer.
2. Press [F11] key to start the slideshow.
3. Press [Windows] + [SHIFT] + [Arrow] key (the arrow keys depends on your monitor's location which is either left, right or even top).
4. Press [Windows] key again to activate your main monitor screen.

Isn't that cool ?

Happy Computing !!!